Subsections of Custom Models (CDX)
Quickstart: Hello World
CDX Runtime Quickstart
The CDX Model Runtime runs your own application, a Simulink model or C code, on
the CD6’s dedicated Cortex-M4 model processor, alongside the display firmware.
The model receives dash channel values, runs at a fixed rate and sends results
back as new dash channels. The display setup can then show, log or transmit
them like any other channel. Use a model for control strategies, calculations
and logic beyond what a Dash Design setup can express.
This quickstart builds the supplied starter application, a “hello world” that
echoes an analogue input back to the dash, and runs it on a CD6. You do not need
MATLAB.
flowchart LR
    A["Create project"] --> B["Install tools"] --> C["Build"]
    C --> D["Load into a Dash Design setup"] --> E["Upload and check"]
What You Need
- A CD6 with model-runtime firmware, connected to your PC by USB.
cdx devices can also list other GEMS displays, but they cannot run models.
- GEMS Dash Design with CDX Model support, from
GEMS downloads.
- GEMS Ginmake 2.88 or newer, with a
Ginmake Simulink licence. Obtain
both from GEMS and install the licence using Dash Design.
- This runtime release,
cdx-runtime-<version>.zip.
The install script below provides the remaining build tools: the Arm compiler,
CMake and Ninja.
Create the Project
Open PowerShell in the folder containing cdx-runtime-<version>.zip. Replace
<version> with your downloaded release version, then run:
1New-Item hello-cdx -ItemType Directory
2cd hello-cdx
3Expand-Archive '..\cdx-runtime-<version>.zip' .
4Copy-Item .\cdx-runtime\examples\project-template\* . -Recurse
This extracts the runtime into a cdx-runtime subfolder and copies the
contents of the starter template, including its .gitignore, into the
project root:
1hello-cdx\
2  cdx-runtime\        The complete downloaded runtime - do not edit.
3  main\               Application integration code.
4  ipc\                DBC files for CD6 <=> Model communication.
5  CMakeLists.txt      CMake build script for the project
6  CMakePresets.json   CMake toolchain presets for the project
7  cdx-project.json    CDX project configuration, used by the `cdx` command-line tool.
8  model-ipc.json5.in  GEMS ginmake tool configuration file template.
Keep your project files outside cdx-runtime. You can then replace the entire
runtime folder during updates without affecting them.
Consider using source control such as git, with cdx-runtime as a submodule.
From the project root, run the signed installer supplied with the runtime:
1.\cdx-runtime\install-tools.ps1
Accept its offers to install Arm GNU Toolchain 15.3.rel2 to
C:\Tools\arm-gcc-15.3.rel2, CMake and Ninja. It never changes or removes
existing compilers. From Command Prompt, or if PowerShell scripts are blocked,
run cdx-runtime\install-tools.cmd instead.
See Installing Tools for the script’s options, manual
installation and compiler selection.
Build
Run these commands from the project root, one at a time. Stop if a command
fails. Adjust the compiler path if you installed it elsewhere.
1$env:PATH = "C:\Tools\arm-gcc-15.3.rel2\bin;$env:PATH"
2.\cdx-runtime\setup-cdx.ps1
3cdx verify-release --runtime cdx-runtime
4cdx doctor --operation build
5cdx compile
6cdx verify-image --image build\cm4-release\MDL_FIRM.bin
| Command |
Purpose |
setup-cdx.ps1 |
Adds the cdx command-line tool to this terminal’s PATH. Repeat in each new terminal. From Command Prompt, use cdx-runtime\setup-cdx.cmd. |
verify-release |
Checks the runtime’s files against its release manifest. |
doctor |
Checks that the build tools are available. It cannot confirm the Ginmake licence. |
compile |
Generates the IPC code with Ginmake, compiles and packages the application. |
verify-image |
Checks the finalized firmware image without changing it. |
The build produces build\cm4-release\CD6-project-template.cdxmodel, the model
package that you load into Dash Design. It contains the finalized firmware,
MDL_FIRM.bin, and the DBC files that describe the model’s inputs and outputs.
Never deploy MDL_FIRM.raw.bin: it will not run on the CD6.
Run cdx to list the commands, or cdx help <command> for help with one.
The CDX CLI Guide covers terminal shortcuts, MATLAB use and
all commands.
Run It on a CD6
A .cdxmodel package is not a complete display setup. Load it into a Dash
Design setup, then upload the setup to the display. See
Configuring with Dash Design and the
Dash Design manual for general setup editing.
-
In Dash Design, create a new setup
for your CD6 type.
-
On the Setup tab, open the CDX Model panel and click
Load CDX Model…. Select
build\cm4-release\CD6-project-template.cdxmodel, choose
Embedded in setup, then click Load Model.
Dash Design sends the setup’s Analogue 1 to Analogue 8 channels to the
model, and adds channels MDL_CTR, MDL_CPU_TEMP and MDL_CPU_LOAD for
the model’s outputs.
-
On the Design tab, add value gauges showing Analogue 1 and MDL_CTR.
-
Save the setup, for example as hello.cd6.gdd in the project folder.
-
Connect the CD6 by USB and choose File > Upload To Display (F7). The
model firmware is programmed with the setup.
Check It Is Running
A successful upload does not prove that the model is running. Apply a voltage
to analogue input 1 and vary it:
MDL_CTR shows the input in raw counts, about 704 per volt, and follows it.MDL_CPU_TEMP and MDL_CPU_LOAD approximately repeat the Analogue 1 and
Analogue 2 voltages. Despite their names, they are demonstration values, not
processor measurements.
The starter sends its outputs every 5 ms. It does not print to a console.
Deploy From the Command Line (Optional)
After saving a setup, the CLI can embed each new build into a copy of it and
upload without using the Dash Design window. Replace 12345 with the serial
number shown by cdx devices:
1cdx doctor --operation deploy
2cdx compile
3cdx embed --setup hello.cd6.gdd --output run.cd6.gdd
4cdx devices --json
5cdx deploy --setup run.cd6.gdd --serial 12345
embed writes the package into a separate deployment copy and leaves
hello.cd6.gdd unchanged. deploy uploads that copy only. Without --serial,
it selects the first USB display. Uploads report model_startup_verified: false,
so repeat the signal check above.
Unattended upload fails, rather than prompting, for a mismatched display type,
a nonempty log or a setup that exceeds the display’s memory. Resolve these in
Dash Design. See Deploying to a display
and pipelines, such as
cdx compile+deploy.
Next Steps
Everyday Commands
Run these from the project root, after setup-cdx.
| Task |
Command |
| Rebuild after editing C sources |
cdx compile |
| Build for debugging |
cdx compile --preset cm4-debug. Do not build Release and Debug at the same time. |
| Clean build outputs |
cdx clean, then cdx compile |
| Discard a cached compiler |
cdx configure --fresh, then cdx compile. Requires CMake 3.24+. |
| Generate Simulink code and build |
cdx build. See Simulink Projects. |
| See commands and options |
cdx --help or cdx help compile |
Troubleshooting
| Problem |
Next step |
cdx is not found |
Run the setup command again in the terminal you are using. Alternatively, use cdx-runtime\bin\cdx.exe in place of cdx. |
| A build tool is missing |
Check its executable directory is on PATH, reopen the terminal and rerun cdx doctor --operation build. |
| Compiler version mismatch |
Run cdx-runtime\install-tools.cmd to install/select the exact version in release-manifest.json beside older compilers, then run cdx configure --fresh (or Configure Fresh in CDX Project Tools) and rebuild. |
| CMake still selects the old compiler |
Changing PATH does not replace a cached compiler. Select the intended toolchain, run cdx configure --fresh (CMake 3.24+), then cdx compile. Settings present only in the old cache are discarded. |
| Dash Design reports a channel name conflict or missing channel when loading the model |
Model input signals must match existing numeric channels by name, ignoring case and punctuation. Start from a new CD6 setup, or rename the conflicting channels. |
Configure setup or supply --setup |
cdx embed and cdx deploy need a saved display setup. Follow Run It on a CD6. Building alone needs none. |
| A USB display is listed but rejects the model |
Listing a device does not imply CDX support. Use a CD6 with model-runtime firmware and a matching CD6 setup. |
The upload succeeds but MDL_CTR does not change |
Check that the setup embeds the newly built package, that analogue input 1 is wired and changing, and that the display firmware supports models. |
Upload fails with Cannot implicitly convert type 'int' to 'bool' |
An older CLI mishandles Dash Design job flags. Replace the complete runtime with the current release, not only its executable. |
Deployment preflight reports missing SupportsCdxModelImageDescriptor or an unsupported descriptor |
Install a compatible Dash Design release. The display-mismatch override cannot bypass format compatibility checks. |
| Release verification fails |
Replace the runtime with a clean GEMS release. Do not delete the manifest or disable checks to make an ordinary build pass. |
Building a CDX application needs an Arm compiler, CMake, Ninja and a licensed
Ginmake. Programming a display needs GEMS Dash Design. MATLAB is needed only to
generate code from your own Simulink models.
The Quickstart runs the install script and builds the starter.
This page covers the script’s options, manual installation and compiler
selection.
From the project root, run the signed installer supplied with the runtime:
1.\cdx-runtime\install-tools.ps1
From Command Prompt, or if PowerShell scripts are blocked, run
cdx-runtime\install-tools.cmd instead.
The script:
- Lists every ARM GNU compiler it finds on
PATH and in common folders such as
C:\SysGCC and C:\Tools.
- If GCC 15.3.1 is missing, offers to download Arm GNU Toolchain 15.3.rel2 from
the GEMS mirror, verify its SHA256 and extract it to
C:\Tools\arm-gcc-15.3.rel2.
It offers this even if an older compiler is installed, such as GCC 10.3 from
VisualGDB or an earlier runtime.
- Offers to set the
ARM_GCC_15_3_REL2 user environment variable.
- Explains how to select the compiler in Dash Design CDX Project Tools, a
terminal or
CMakePresets.json.
- Offers to install missing CMake and Ninja through
winget.
- Reports Ginmake and MATLAB only.
It never changes or removes existing compilers.
| Option |
Effect |
-CheckOnly |
Report only. Install and change nothing. Exit code 1 if GCC 15.3.1 is missing. |
-Yes |
Accept every offer without prompting. |
-ToolchainRoot D:\Tools\arm-gcc-15.3.rel2 |
Install the compiler to another empty folder. |
-CompilerArchive <zip> |
Install from an already downloaded copy of the exact compiler ZIP. |
The script does not edit PATH or the execution policy. Restart terminals, VS
Code and Dash Design after changing environment variables or installing tools.
The table below lists the same tools for manual installation.
Run cdx doctor --operation build to check tool availability before installation.
It does not prove that the compiler version, Ninja or a Ginmake licence is
usable. The first build checks these. A missing objcopy usually means the
compiler’s bin directory is not on PATH.
You can install some tools from the terminal with winget, as shown below.
| Tool |
Location / Details |
| ARM Toolchain 15.3.rel2 |
GEMS mirror |
| 15.3.rel2 source (optional) |
GEMS mirror |
| CMake 3.21+ |
winget install Kitware.CMake or CMake |
| Ninja build system |
winget install Ninja-build.Ninja or Ninja |
| GEMS Ginmake |
Version 2.88+ recommended. Requires a Ginmake Simulink licence. Obtain both from GEMS and install licences using GEMS Dash Design. Ginmake generates code for Simulink model integration. |
| GEMS Dash Design |
GEMS downloads. Required for programming the CD6 display and editing display setups. See the Dash Design manual. |
| MATLAB (optional) |
MATLAB, Simulink, Simulink Coder and Embedded Coder. Needed only to generate code from your own Simulink models. |
| Visual Studio Code (optional) |
winget install Microsoft.VisualStudioCode or VS Code. Recommended for editing and managing development. Extensions support CMake, C/C++ and Git integration. |
You can configure tool locations instead of adding them to PATH. For CLI
workflows, put shared CMake/Ginmake paths in cdx-project.json and machine-specific
overrides in the ignored cdx-project.local.json. Paths can use Windows %VAR%
environment references. Configure Ninja and the compiler through CMake.
| Tool |
Alternative to PATH |
| CMake |
Set tools.cmake in the CLI project configuration. |
| Ginmake |
Set tools.ginmake in the CLI project configuration. The CLI passes it to CMake. |
| Ninja |
Set CMAKE_MAKE_PROGRAM in the CMake preset/cache. There is no tools.ninja setting. |
| ARM compiler |
Set CDX_RT_TOOLCHAIN_BIN in the CMake preset/cache. |
Running CMake directly does not read the CLI’s project configuration. If
cmake is not on PATH, invoke it by its full path. See
Project configuration for the CLI settings.
Alternatively, add the tools’ executable directories to your user PATH using
installer options or the Windows PATH settings.
For a self-contained setup, set PATH only in the current terminal. Prefer this
when you have multiple compiler versions or toolchains. Close and reopen your
terminal after changing the system PATH.
Install The Compiler Manually
- Extract the compiler ZIP to a dedicated folder, such as
C:\Tools\arm-gcc-15.3.rel2. The ZIP has bin at its root.
- Add
C:\Tools\arm-gcc-15.3.rel2\bin to your terminal’s PATH.
This is the directory containing arm-none-eabi-gcc.exe.
- Check that
arm-none-eabi-gcc -dumpfullversion prints 15.3.1 and
arm-none-eabi-gcc -dumpmachine prints arm-none-eabi.
mingw-w64-i686 describes the Windows host, not the target CPU. This compiler
builds Cortex-M4 firmware with the supplied Thumb, FPv4-SP-D16, hard-float settings.
For example, in PowerShell:
1$env:PATH = "C:\Tools\arm-gcc-15.3.rel2\bin;$env:PATH"
2arm-none-eabi-gcc -dumpfullversion
3ninja --version
The corresponding Arm GNU Toolchain 15.3.rel2 source snapshot (GEMS mirror)
is provided alongside the binary for GPLv3 corresponding-source access.
It is not required to compile your application. Retain the bundled
licenses\toolchain\license.txt, including the GCC Runtime Library Exception
and newlib notices, when redistributing firmware.
Use a fresh application build directory when changing compiler versions so
CMake selects the new compiler. The manifest’s compiler_version records which
compiler built the bundled runtime. It does not restrict your application
compiler. The application compiler must still be GNU for
arm-none-eabi and use the required Cortex-M4 hard-float ABI settings.
Optional: Use A Version-Specific Compiler Variable
If you have multiple compiler releases, you can define an environment variable
for each installation:
- Set
ARM_GCC_15_3_REL2 to the 15.3.rel2 installation root, not its bin
directory:
1$env:ARM_GCC_15_3_REL2 = "C:\Tools\arm-gcc-15.3.rel2"
- In your application’s
CMakePresets.json, add this entry to the
cm4-release preset’s existing cacheVariables object. Keep its other entries.
The example’s cm4-debug preset inherits this setting:
1"CDX_RT_TOOLCHAIN_BIN": "$env{ARM_GCC_15_3_REL2}\\bin"
The variable is not recognised automatically. The preset entry connects it to
the toolchain configuration. Define the variable before configuring or building.
This records the compiler release while letting each developer choose an
installation folder. Multiple releases can coexist without changing the global
PATH. CLI, direct CMake and VS Code builds share the selection if they use
these presets and inherit the variable.
The PowerShell assignment above affects only that terminal and its child
processes. For regular use, define a Windows user environment variable and
restart terminals and VS Code so they inherit it. Changing the variable does not
replace a cached compiler. Use a fresh configuration/build directory when
switching installations.
The CLI’s doctor checks do not read CDX_RT_TOOLCHAIN_BIN. Keep the selected
compiler’s bin directory on the terminal’s PATH, or set tools.objcopy in
cdx-project.local.json to the full path of its arm-none-eabi-objcopy.exe.
Visual Studio Code
Install Microsoft’s C/C++ and CMake Tools extensions, open the application
folder, select the cm4-release or cm4-debug preset and build. Set
CDX_RT_TOOLCHAIN_BIN locally if the compiler is not on PATH.
Application Template
CD6 Project Template
This handwritten starter receives dash analogue values through Ginmake-generated
IPC getters and sends calculated values back every 5 ms using setters.
It has no console output. The Quickstart creates a project
from it, builds it and runs it on a CD6. This page explains how it works and
how to replace it with your own model.
Project Layout
 1project-template/
 2  cdx-runtime/         Extract the runtime here; replace as a whole for updates
 3  main/                Application callbacks and model-owned headers
 4  ipc/                 DBC definitions shared with Dash Design
 5  model-generated/     Optional Embedded Coder C sources
 6  ginmake-generated/   Created automatically during the build
 7  build/               Build output
 8  CMakeLists.txt       Your application build and packaging commands
 9  CMakePresets.json    Release and Debug presets
10  cdx-project.json     CLI workflow defaults
11  model-ipc.json5.in   Your Ginmake configuration
Build
Copy this example outside cdx-runtime and extract the runtime ZIP into the copy.
Install the tools listed in Installing Tools. From the project root:
1.\cdx-runtime\setup-cdx.ps1
2cdx compile
compile configures CMake automatically. Without terminal setup:
1cdx-runtime\bin\cdx.exe compile
If the toolchain is not on PATH, point CDX_RT_TOOLCHAIN_BIN at its bin directory:
1cmake --preset cm4-release -DCDX_RT_TOOLCHAIN_BIN="C:\Tools\arm-gcc-15.3.rel2\bin"
2cdx-runtime\bin\cdx.exe compile
Ginmake runs automatically. Outputs:
build/cm4-release/CD6-project-template.cdxmodel- Finalized
build/cm4-release/MDL_FIRM.bin. Never deploy MDL_FIRM.raw.bin.
Use cm4-debug for Debug. Build configurations share ginmake-generated, so
build sequentially.
Migration: Use cdx compile for this starter and no-MATLAB scripts.
cdx build includes incremental MATLAB generation and requires explicit
model/initialization configuration.
Try On A CD6
Follow Run It on a CD6 in the Quickstart.
In summary:
- In a new Dash Design setup for your CD6, use Setup > CDX Model >
Load CDX Model… to load
build/cm4-release/CD6-project-template.cdxmodel
with Embedded in setup.
- Dash Design matches the packaged dash Tx DBC,
CD6-Main-IPC-sample.dbc
(model input), to the setup’s Analogue 1 to Analogue 8 channels and sends
them in frames 0x001 and 0x002. It creates channels for the dash Rx DBC,
CD6-Model-IPC-sample.dbc (model output), received in frame 0x200.
- Display
MDL_CTR on a gauge, then upload the setup, including the embedded
model firmware, to a CD6 with model-runtime support.
- Apply nonzero Analogue 1 input.
MDL_CTR should mirror input frame 0x001’s
first raw 16 bits. MDL_CPU_TEMP and MDL_CPU_LOAD are demo input calculations,
not measured processor statistics.
Keep setup and model DBCs identical. After interface changes, regenerate,
rebuild and reload the model. Confirm editor/dash firmware support before deployment.
Use Your Model
Set REV_NAME and REV_VERSION in main/version.h for model and generated
A2L identification.
Call your model’s initialization and base-rate step from main/generated.c.
Stage Embedded Coder sources through CDX. The build uses
model-generated/cdx-generated.cmake when present, preserving source/include layout.
Legacy flat .c files are supported except ert_main.c.
Keep model-specific type headers in your application.
Replace sample DBC paths in both the Ginmake configuration and
CDX_RT_configure_model. This IPC adapter is not a complete Simulink model.
The commented build file controls application choices:
CDX_RT_configure_model: common linking and the runtime’s compiled packaging
command. DBC directions use the dash perspective.CDX_RT_generate_ipc: generated sources and build dependencies.
Follow the Ginmake workflow
for Simulink workspace generation.
Simulink Projects covers initialization scripts, model
settings and Dash Design CDX Project Tools builds.
The single-rate runtime calls all five CDX_app_* callbacks serially.
Keep callbacks bounded. Never call CDX APIs from interrupts.
Model Station Name
The XCP station ID (GET_ID ASCII) defaults to the model target name, normally
${PROJECT_NAME}. To override it, add STATION_NAME to the existing
CDX_RT_configure_model(...) call in CMakeLists.txt:
1CDX_RT_configure_model(${PROJECT_NAME}
2    ...
3    STATION_NAME "My Custom Model")
- Use up to 63 printable ASCII characters.
STATION_NAME is separate from NAME, which sets the package display name.
Changing only the package name does not change the station name.- The name is compiled into the model identity, independently of the EPK hash.
Rebuild and deploy the model after changing it.
- Named images need display firmware and packaging tools that support image
descriptor versions 3/4. Older model images still load on updated firmware and
report
CD6 as their station name.
Simulink Fast I/O
Use a runtime containing cdx_fast_io.h and updated Ginmake. Old Ginmake lacks
urgent_tx. Rebuilding this repository does not update installed Ginmake:
select the updated executable in project tooling or install its release.
Add cdx-runtime\matlab to the path, then call cdx.inputs('base') in your
initialization script.
For data dictionaries, signals = cdx.inputs() returns signal definitions.
Channels 1..8 expose these getter-style scalar signals:
| Signal names |
Type |
Units or values |
CDX_adc_1_raw through CDX_adc_8_raw |
uint16 |
counts |
CDX_adc_1_voltage through CDX_adc_8_voltage |
single |
V |
CDX_adc_1_valid through CDX_adc_8_valid |
uint8 |
0 or 1 |
Signals use the shared cdx.inputSignal factory and getter-only GetSet bindings
in cdx_fast_io.h. Getters share one cached snapshot without reacquisition.
Voltage is raw multiplied by 0.001421 V/count (nominal CD6 sample-DBC factor,
not individually calibrated).
Invalid raw/voltage values stay held. Check validity before use.
Stale/offline input clears validity. The target model must not write these signals.
Aggregate ADC data stores
For compatibility, you can still read these global data stores:
CDX_model_adc_raw: eight uint16 values.CDX_model_adc_valid_mask: bit 0 means input 1.CDX_model_adc_sequence.CDX_model_adc_timestamp_us (uint32): Dash clock, not model clock.CDX_model_adc_fresh (uint8): newly observed scan, not necessarily every step.
Use Data Store Read blocks directly or connect them to algorithm input ports.
The adapter updates stores once before each step. The target must not write them.
Acquisition failure holds raw values and clears validity. Choose an invalid-input
safe state for your algorithm.
Simulation harness
Supply synthetic or recorded inputs in a Simulink test harness.
cdx.adcSample(raw, sequence, timestampUs, validMask, fresh) returns values with
matching names, types and dimensions for Data Store Write blocks or algorithm
input ports. It installs no source block. Select sources only in the harness
and exclude their writes from target builds. Test invalid masks, repeated
sequences and stale data. The native CDX simulator does not emulate hardware
fast I/O.
Urgent physical CAN transmit
Select physical DBC messages explicitly in Ginmake’s can configuration:
{
   port: 1,
   tx: ['PhysicalCommands.dbc'],
   urgent_tx: [
      {frame: 'TorqueRequest', port: 0, policy: 'step', lifetime_us: 2000},
      {frame: 'Heartbeat', port: 0, policy: 'periodic', period_us: 1000, lifetime_us: 3000},
      {frame: 'ShiftRequest', port: 0, policy: 'triggered', lifetime_us: 2000}
   ]
}
The outer port selects the Ginmake DBC group. Urgent port selects physical CAN:
0 = CAN1, 1 = CAN2. Keep ordinary IPC messages in port: 'IPC'.
Never reinterpret IPC IDs/payloads as physical commands.
Urgent messages leave ordinary TX rate groups. Multiplexed urgent messages and
payloads outside 1..64 bytes are rejected.
The generated workspace declares an ImportedExtern uint8 trigger,
CDX_<packed-frame-prefix>urgent_request. Update DBC signals before setting it
nonzero. The sender consumes each request even if enqueue fails.
Call the sender once per step:
urgent_tx policy |
When it sends |
step |
Every call. |
periodic |
First call, then when the interval elapses. Skips missed releases and rearms from current time. |
triggered |
Nonzero request trigger. |
Periods below the model period cannot create extra model executions.
Failed attempts are dropped, not retried. The generated TX header exports
per-message urgent_status, urgent_accepted and urgent_rejected diagnostics.
Counters wrap at 32 bits. Accepted means queued, not delivered.
Budget for four-entry queues, bus configuration, arbitration and expiry.
Model timing
Use a fixed-step discrete solver, disable multitasking and set an explicit base
step, e.g. 0.0005 or 0.001 seconds. cdx.generate:
- Reads configured
FixedStep, resolving model-workspace expressions.
- Requires integer-microsecond timing. Rejects
auto.
- Stages
cdx_model_timing.h with generated sources.
It determines timing without compiling or inspecting individual block sample times.
Simulink checks model/code-generation compatibility during slbuild.
Period changes require model regeneration, not just a runtime callback change.
CMake adapter
Include model-generated/cdx-generated.cmake, remove main/generated.c from target
sources, then call the adapter helper once per target:
1CDX_RT_configure_simulink(${PROJECT_NAME}
2      HEADER ACT1.h INITIALIZE ACT1_initialize STEP ACT1_step
3      ADC_MAX_STALE_US 5000)
Entry points must be void(void). Keep the ipc_model_ Ginmake prefix,
CDX_RT_configure_model and CDX_RT_generate_ipc. Each model step:
flowchart LR
    inputs["Refresh cached inputs: ADC snapshot, IPC RX"] --> step["Model step"]
    step --> urgent["Urgent physical CAN sends"]
    urgent --> ipc["Ordinary IPC TX"]
Input failures, urgent rejection and ordinary IPC queue-full/no-data results are
nonfatal. Use validity and TX diagnostics for application policy.
No asynchronous model task is created.
For legacy imported C without staged timing metadata, set LEGACY_PERIOD_US 10000
to match its generation period. The helper rejects overrides when generated timing
metadata exists. Do not duplicate CDX_app_* callbacks.
Validation
With Simulink and Embedded Coder, run:
addpath('model-runtime/matlab'); runtests('model-runtime/matlab/tests').
Then generate and build your model. Helpers were not run on the development PC
without MATLAB. Before deployment, confirm the generated interface and measure
end-to-end ADC-to-CAN latency on hardware. Automated build tests have not verified
physical-hardware operation.
CLI workflows
cdx-runtime\bin\cdx.exe --help lists stages and workflows.
Before matlab+compile or matlab+compile+embed, configure explicit
model/initialization and setup/deployment paths in the project.
| Command |
Purpose |
compile+embed |
Prepare staged code without MATLAB. |
compile+deploy |
Compile, implicitly embed and upload. |
deploy |
Upload a prepared setup only. |
compile |
Compile without launching MATLAB or programming hardware. |
See the runtime CLI guide for current-session MATLAB helpers, scoped cleaning
and explicit device selection.
Runtime updates
Follow the runtime’s
verified upgrade and backup sequence.
Replace cdx-runtime/ without merging versions. Move old build/IPC outputs aside.
Keep application code, staged model sources, DBCs and presets in the project root.
Regenerate the deployment setup before uploading.
Model Integration
This page explains how a CDX application connects to the dash: its project
structure, the Model IPC interface, Simulink integration and calibration.
Build and run the Quickstart first.
Project Structure
A CD6 application owns its source code and build configuration. The CD6
runtime release is extracted into a cdx-runtime folder inside the project:
 1my-model/
 2  cdx-runtime/        Prebuilt runtime, headers and build tools
 3  main/               Application callbacks and headers
 4  ipc/                DBC definitions for the Model IPC connection
 5  model-generated/    C sources from Embedded Coder, if used
 6  ginmake-generated/  IPC sources generated by Ginmake
 7  build/              Compiled firmware and model package
 8  CMakeLists.txt      Application build configuration
 9  CMakePresets.json   Release and Debug presets
10  cdx-project.json    CDX CLI project configuration
11  model-ipc.json5.in  Ginmake configuration
Keep your changes outside cdx-runtime. The whole runtime folder can then be
replaced to change versions without replacing your application. See
Updating the Runtime.
Model IPC Messages
The model communicates with the dash through the virtual Model IPC CAN channel,
not directly through an external CAN connector. Two DBC files define the
messages and signals in each direction. Directions are named from the dash
perspective:
| Dash direction |
Model direction |
Ginmake input |
CDX_RT_configure_model |
| Dash transmits on Model IPC |
Model receives dash values |
rx DBC |
TX_DBC |
| Dash receives on Model IPC |
Model sends dash values |
tx DBC |
RX_DBC |
flowchart LR
    channels["External CAN / dash channels"] <--> dash["CM7 dash firmware"]
    dash -->|"Dash transmits on Model IPC"| ipc["Virtual Model IPC CAN bus"]
    ipc -->|"Model receives (Ginmake rx DBC)"| model["CM4 model (CDX runtime)"]
    model -->|"Model sends (Ginmake tx DBC)"| ipc
    ipc -->|"Dash receives on Model IPC"| dash
    xcp["XCP on external CAN1/CAN2"] <--> dash
CM7 handles XCP on external CAN1/CAN2, separately from Model IPC.
- Write the DBC files yourself, as in the template’s
ipc folder, or design
the Model IPC messages in Dash Design and export them as DBC files.
- Use
port: "ipc" in the Ginmake configuration. Ginmake generates get/set
functions and Simulink signals, so the model works with named signals rather
than frames.
- The build packages the DBC files with the firmware in the
.cdxmodel file.
When you load the package, Dash Design creates a channel for each signal the
model sends. It connects each signal the model receives to the existing
numeric channel with the same name. Matching ignores letter case and treats
spaces and punctuation as underscores.
- Keep the application and setup DBCs identical. The firmware records a hash
of its DBC interface, and Dash Design rejects packages whose firmware and DBC
files do not match. If you change the interface, regenerate the sources,
rebuild and reload the package.
Packaging --rx and --tx arguments also use the dash directions. The
example builds already handle this reversal.
Simulink Workflow
For Simulink models:
- Follow the Ginmake Simulink workflow
to generate workspace definitions and model integration code.
- Follow the Simulink Projects guide
for the project’s
initialize.m, CDX signals and Dash Design CDX Project Tools builds.
- Put Embedded Coder output in
model-generated. The CDX CLI stages it for you.
- Call your model’s initialization and base-rate step, either with
CDX_RT_configure_simulink or from main/generated.c. See
Implementing The Callbacks.
The application template is an IPC adapter, not a complete Simulink project.
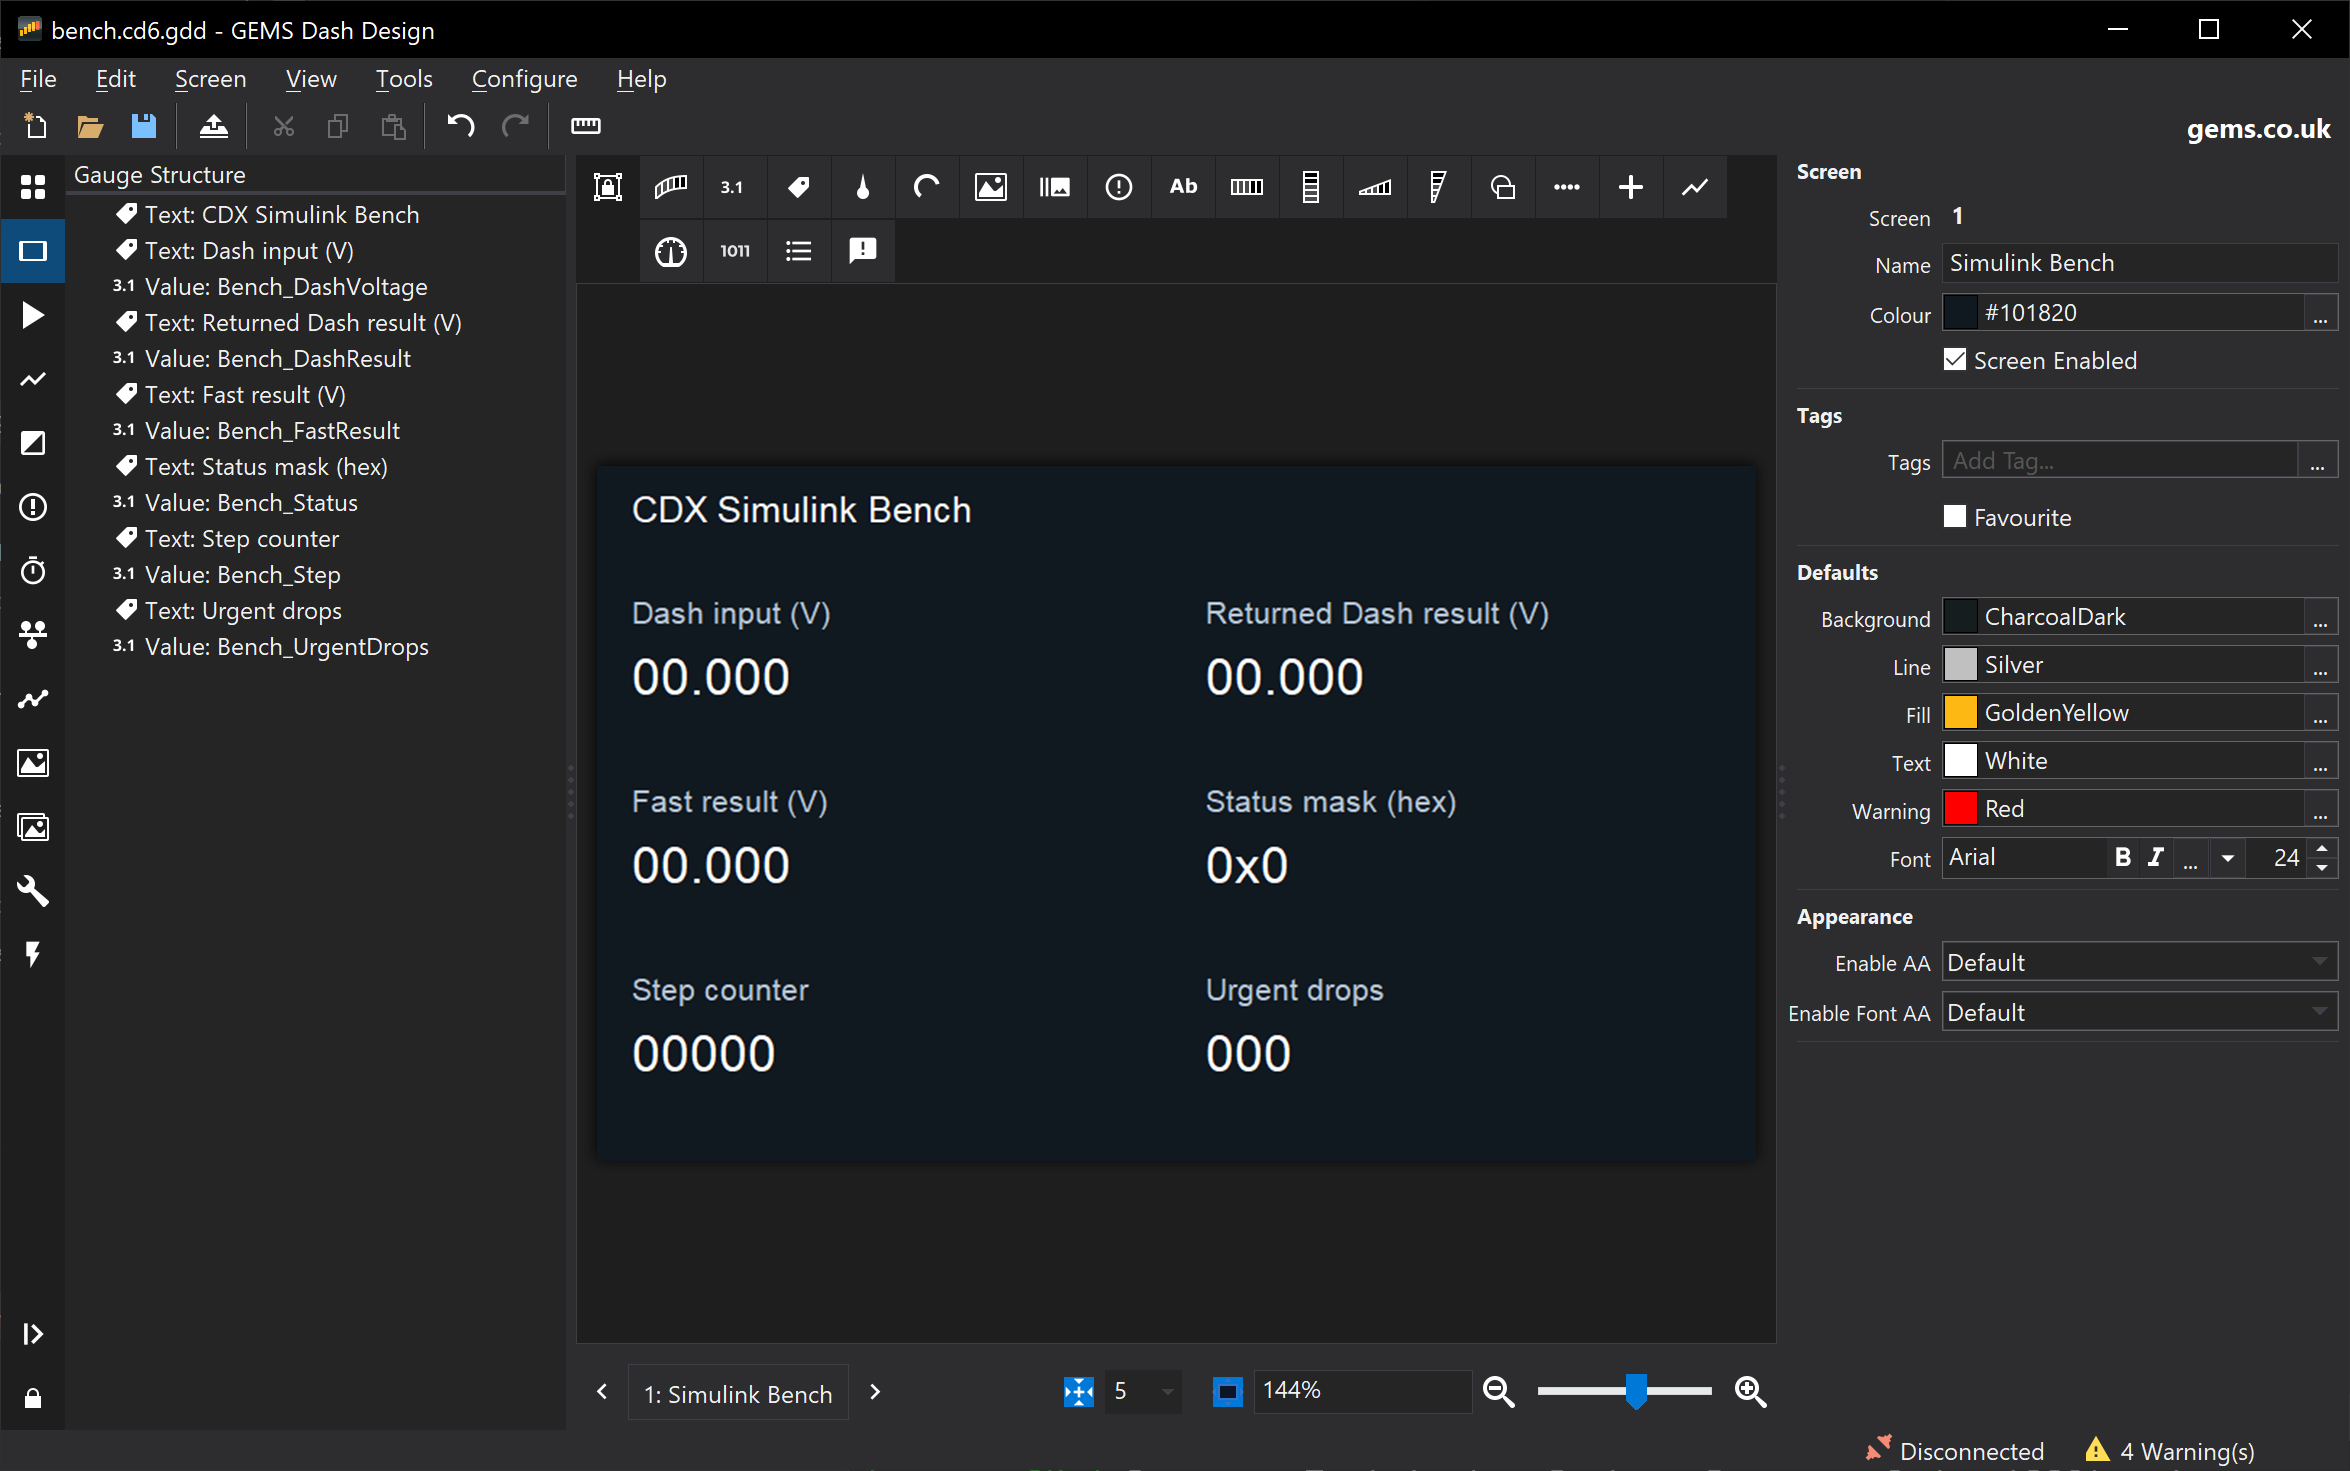
The Simulink Bench example
is a complete model, adapter and Dash Design setup. It steps a stock-block model
every 1 ms. Each step conditions Analogue 1 received both through Dash channel
evaluation and through the fast ADC API. The example also covers urgent CAN
transmit and XCP calibration with nonvolatile storage:
Loading The Model Into A Setup
The build writes the *.cdxmodel package and finalized MDL_FIRM.bin into
build/cm4-release/. Do not deploy MDL_FIRM.raw.bin.
- Load the
*.cdxmodel into an editable CD6 setup in a compatible
GEMS Dash Design release. See
Adding a Custom Model to a Setup.
- Use the model’s output channels in the setup like any other channel.
- Upload the setup with its embedded model firmware to a CD6 whose firmware
supports the model runtime. Alternatively, use
cdx embed and cdx deploy.
See Run It on a CD6.
- Check that the model is running by changing an input and watching an output.
Uploading alone does not prove that the model has started.
The examples have automated ARM build/package checks. You still need to verify
operation on a physical device with your editor, dash firmware and hardware.
Application Notes
Your application provides the five CDX_app_* callbacks, either generated by
CDX_RT_configure_simulink or written by hand. See
Model Callbacks for when
each runs and the rules they must follow.
The image and private RAM limits are each 128 KiB. The default stack is 4 KiB.
Inspect your link map and measure execution time and stack use on the board.
Calibration And NVM
The echo example’s optional calibration build supplies a matching A2L. Keep that
A2L with its firmware.
- Use restored parameters. Do not reset them to defaults during initialization.
- Request XCP
STORE_CAL to persist edits. Persistence requires working dash storage.
- Use external CAN1 or CAN2 for XCP, not Model IPC.
The Simulink Bench example
shows calibration with nonvolatile storage in a Simulink model.
Simulink Projects
Simulink Projects
This guide sets up a Simulink model so that cdx build and Dash Design’s
CDX Project Tools generate, compile and package it without manual steps.
It extends the Quickstart, which builds the hand-written starter
without MATLAB. Complete that first build before adding a model.
Alternatively, start with the self-contained
Simulink Bench example. Its original
stock-block model is created by a MATLAB script rather than a release-specific
binary model file, and its adapter demonstrates IPC, fast I/O and persistent
XCP parameters without any customer project dependencies.
Checklist
- Install the tools, including Arm GNU Toolchain
15.3.rel2 (
cdx-runtime\install-tools.cmd offers to install it beside older
compilers), MATLAB with Simulink Coder and Embedded Coder, and licensed Ginmake.
- Create the project from the project template.
- Put the model, its data dictionary and supporting files in
model\.
- Write
model\initialize.m.
- Point Ginmake’s workspace output at
model\workspaces.
- Add the model and initialization script to
cdx-project.json.
- Check the model configuration and callbacks.
- Connect the generated code in CMake.
- Save everything in MATLAB, then build in CDX Project Tools
or run
cdx build.
Project Layout
 1my-project\
 2  cdx-runtime\          Complete runtime release - replace as a whole, do not edit
 3  cdx-project.json      Model, initialization, setup and output paths
 4  CMakeLists.txt        Application build and packaging
 5  CMakePresets.json     cm4-release and cm4-debug presets
 6  model-ipc.json5       Ginmake configuration
 7  ipc\                  DBCs shared with the Dash Design setup
 8  main\                 Application callbacks, version.h and adapters
 9  model\
10    MyModel.slx         Simulink model
11    MyModel.sldd        Data dictionary (optional)
12    initialize.m        Project-owned initialization script
13    workspaces\         Ginmake-generated workspace scripts (do not edit)
14  model-generated\      Generated C staged by cdx (do not edit)
15  ginmake-generated\    Generated IPC C (do not edit)
16  build\                Build output
17  .cdx\                 CLI and Dash Design state (machine-local - do not add to version control)
Generated folders, .cdx\, build\ and cdx-project.local.json belong in
.gitignore. The template’s .gitignore already lists them.
Initialization Script
When MATLAB generation is needed, cdx build, cdx matlab and the matching
CDX Project Tools steps run this sequence:
flowchart TD
    A["cdx build (terminal or CDX Project Tools)"] --> B["CMake configure + Ginmake IPC<br/>regenerates model\workspaces"]
    B --> C{"Model inputs changed?"}
    C -- no --> F
    C -- yes --> D["matlab -batch in project root<br/>adds cdx-runtime\matlab"]
    D --> E["cdx.generate: run initialize.m,<br/>load model, slbuild, stage C"]
    E --> F["CMake compile + package<br/>.cdxmodel and MDL_FIRM.bin"]
    F --> G["Load Model... / embed + deploy"]
The batch MATLAB starts in the project root. It adds cdx-runtime\matlab
to the path and calls cdx.generate. That function runs the configured
initialization script in the base workspace, loads the model by its full path
and generates code. Afterwards it restores the previous MATLAB path and current
folder. cdx.workflow does the same in an already open MATLAB session.
The model folder is therefore not the current folder, and only paths added
by the initialization script are available. A complete script for a model in
model\ is:
1modelFolder = fileparts(mfilename('fullpath'));
2projectRoot = fileparts(modelFolder);
3
4addpath(modelFolder);
5addpath(fullfile(modelFolder, 'workspaces'));
6addpath(fullfile(projectRoot, 'cdx-runtime', 'matlab'));
7cdx.inputs('base');
| Line |
Why it is required |
fileparts(mfilename('fullpath')) |
Finds folders relative to the script, so it works from the CLI, Dash Design and an interactive session. Do not use pwd-relative or machine-specific absolute paths. |
addpath(modelFolder) |
Simulink finds data dictionaries (.sldd), enumeration classes (for example ENUM_*.m), referenced models and callback helpers through the MATLAB path. |
addpath(...'workspaces') |
Makes the Ginmake workspace scripts and signal classes available, such as ipc_model_can_rx.m, ipc_model_can_tx.m and GemsSignal.m. The folder must match out_dir_workspace. |
addpath(...'cdx-runtime', 'matlab') |
Provides the cdx.* helpers. Batch generation adds this itself, but interactive simulation, model updates and cdx.workflow need it. |
cdx.inputs('base') |
Defines the CDX fast-I/O input signals (CDX_adc_1_raw … CDX_adc_8_valid and CDX_model_adc_*) in the base workspace. Each signal is bound to a getter in cdx_fast_io.h. Needed only when the model reads them, but harmless otherwise. |
The CDX_adc_* signals must exist before the model is compiled. A model linked
to a data dictionary sees base-workspace signals only when Enable model access
to base workspace (EnableAccessToBaseWorkspace) is on. Otherwise, add the
definitions returned by signals = cdx.inputs() to the dictionary instead of
calling cdx.inputs('base').
The script runs before every generation, so keep it repeatable and
non-interactive:
- Do not save, close or discard models or dictionaries (
save_system,
bdclose, close_system). Generation refuses unsaved changes.
- Do not use
clear all, close all, cd, dialogs or input.
- Do not modify the generated
workspaces files. They are regenerated from the DBCs.
- Add further
addpath calls for shared libraries or referenced models outside
model\, and list external data under
codegen_inputs so incremental builds
notice changes.
Ginmake Workspace Files
The CMake/Ginmake IPC step regenerates the workspace scripts before MATLAB runs.
Set out_dir_workspace in the Ginmake configuration to the folder that the
initialization script adds:
{
    target: "CDX",
    out_dir: "ginmake-generated",
    out_dir_workspace: "model/workspaces",
    file_prefix: "ipc_model_",
    generate: { get_set: true, workspace: true, can_rx_workspace: true, can_tx_workspace: true },
}
Keep file_prefix and the PREFIX passed to CDX_RT_generate_ipc identical.
The generated scripts (for example ipc_model_can_rx.m and ipc_model_can_tx.m)
create the GetSet IPC signals used by the model. Run them from the model’s
InitFcn callback or from the initialization script, after the addpath calls.
Project Configuration
Add the model and initialization script to cdx-project.json. Paths are
relative to that file:
 1{
 2  "format": 1,
 3  "runtime": "cdx-runtime",
 4  "preset": "cm4-release",
 5  "generated_sources": "model-generated",
 6  "model": "model/MyModel.slx",
 7  "initialization": "model/initialize.m",
 8  "setup": "setups/MyDash.cd6.gdd",
 9  "deployment_setup": "output/MyDash-model.cd6.gdd"
10}
setup and deployment_setup are needed only to embed or deploy. Prefer
project-relative paths or %VAR% environment references to absolute paths in a
user’s own folders, so the project builds on other machines. Create the
deployment output folder before building. See
Project configuration for all fields.
Model Configuration
| Setting |
Required value |
| Solver |
Fixed-step, discrete (FixedStepDiscrete) |
| Tasking |
Single-tasking (EnableMultiTasking off) |
| Fixed-step size |
Explicit whole microseconds, for example 0.001 or 0.002 (not auto) |
| System target file |
ert.tlc (Embedded Coder) |
cdx.generate checks the timing settings, generates code only and stages the
period in cdx_model_timing.h. Changing the step requires regeneration.
Model Callbacks
Model callbacks run with the project root as the current folder. A callback such
as PostLoadFcn: addpath("workspaces\") therefore adds nothing during a CDX build.
MATLAB only warns that the folder does not exist. Move path setup into
initialize.m, or build the path from
fileparts(get_param(bdroot, 'FileName')).
Callbacks must not leave the model modified. If they do, generation stops with
CDX:UnsavedModel.
CMake Integration
The project’s CMakeLists.txt includes the staged sources from
model-generated\cdx-generated.cmake and keeps CDX_RT_configure_model and
CDX_RT_generate_ipc. Either call the model’s initialize and step functions from
your own main\ adapter, or use CDX_RT_configure_simulink. The
template’s Simulink section
describes both.
- Save the model and any data dictionaries in MATLAB. MATLAB can stay open.
- In Dash Design, choose Setup > CDX Model > CDX Project Tools… (or
Tools > CDX Project Tools…) and select the project folder containing
cdx-project.json.
- Set Compiler to
arm-none-eabi-gcc.exe from the 15.3.rel2 installation,
for example C:\Tools\arm-gcc-15.3.rel2\bin\arm-none-eabi-gcc.exe. Do not
select an older compiler such as VisualGDB’s C:\SysGCC\arm-eabi (GCC 10.3).
- Set MATLAB to
matlab.exe (for example
C:\Program Files\MATLAB\R2023b\bin\matlab.exe) unless MATLAB is on PATH.
Set CMake, Ninja and Ginmake too if they are not on PATH.
- Click Check Tools.
- The first time, and after changing compiler or runtime versions, run
Configure Fresh so CMake forgets a cached compiler.
- Select Incremental Build (
cdx build). Add Embed Setup and
Deploy with the display serial to program a CD6. Select
MATLAB Generation to force regeneration.
- After a successful build, use the Load Model… notification to import
the new package into the open setup.
Tool selections are stored in the machine-local .cdx\dash-design.json.
Save Tool Paths to Project writes shared defaults to cdx-project.json. Use
%VAR% references there, because other users’ installation folders differ.
The same build runs from a terminal with cdx build, or from MATLAB with
cdx.workflow('full-build', config).
To check the setup interactively, run initialize in MATLAB, open the model and
update the diagram (Ctrl+D) before building.
Using CDX from MATLAB
You can run CDX commands from the MATLAB Command Window or a MATLAB script.
- Add the runtime’s
matlab folder to the MATLAB path.
- Select your project configuration and run commands, as below:
1projectRoot = 'C:\work\my-project';
2addpath(fullfile(projectRoot, 'cdx-runtime', 'matlab'));
3config = fullfile(projectRoot, 'cdx-project.json');
4
5cdx.cli('help', config, 'compile');
6cdx.cli('doctor', config, '--operation', 'build');
These helpers use the project’s bundled executable, so you do not need to run
the terminal setup scripts inside MATLAB. Required build tools must still be
available.
Build Existing Application Code
1result = cdx.cli('compile', config);
This builds and packages the application using existing sources. It does not
generate Simulink code or program the display.
Generate Simulink Code and Build
Configure the model and initialization script in cdx-project.json, as
described in Project Configuration. Save modified
models and data dictionaries before generation. The helper refuses unsaved
changes.
1result = cdx.workflow('full-build', config);
This generates code in the current MATLAB session. It then stages the
sources, builds and packages the application. You need MATLAB, Simulink Coder
and Embedded Coder.
To also prepare the configured display setup and program a specific CD6:
1result = cdx.workflow('full-build-deploy', config, ...
2    'Serial', '12345');
Configure the source setup and deployment output paths first, and create the
output directory. Without Serial, deployment selects the first available USB
display. Network displays require an explicit serial number.
cdx.workflow keeps the full-build, full-build-embed and full-build-deploy
current-session API and MATLAB name/value options. It does not parse CLI
pipelines or --skip-matlab. To forward new pipelines and flags, use cdx.cli:
1result = cdx.cli('compile+embed', config);
2result = cdx.cli('build+deploy', config, '--skip-matlab', '--serial', '12345');
Calling cdx.cli('matlab+compile', config) instead launches a separate batch
MATLAB process. Use cdx.workflow for generation in the current session. See the
MATLAB integration guide
for individual generation steps, additional options and validation limitations.
Troubleshooting
| Problem |
Next step |
Configure model and initialization explicitly |
Add model and initialization to cdx-project.json. |
Unable to resolve the name cdx.inputs |
Add cdx-runtime\matlab to the path in initialize.m. |
Undefined ipc_model_can_rx, GemsSignal or IPC signals |
Check that out_dir_workspace matches the folder added by initialize.m, then rerun the build so Ginmake regenerates it. |
| Data dictionary or enumeration class not found |
Add the model folder, and any shared folders, to the path in initialize.m. |
CDX_adc_* or CDX_model_adc_* undefined |
Call cdx.inputs('base'), or add cdx.inputs() definitions to the data dictionary. |
Warning that workspaces is not a folder |
A callback adds a path relative to the current folder. See Model Callbacks. |
CDX:Timing |
Use a fixed-step discrete, single-tasking model with an explicit step. |
CDX:UnsavedModel or CDX:UnsavedDictionary |
Save in MATLAB, and stop callbacks or initialize.m from changing the model. |
| MATLAB is not found |
Select matlab.exe in CDX Project Tools or set tools.matlab in cdx-project.local.json. |
| Compiler version mismatch or the old compiler is still used |
Select the 15.3.rel2 compiler, then run Configure Fresh (cdx configure --fresh). |
Simulink Bench Example
Simulink Bench
An independent CD6 bench example, not derived from a customer application.
It conditions two views of Analogue 1 with
result = clamp(voltage * gain + offset, 0, 10 V): one received through normal
Dash channel evaluation/Model IPC, the other acquired through the fast ADC API.
Both paths execute in one 1 ms Simulink step.
Use an isolated bench CAN bus only. This example transmits diagnostic data,
not an actuator command. It sends a classic eight-byte CAN1 frame every
millisecond. Check bus load, identifiers, wiring and termination before use.
No hardware is programmed automatically.
Features
| Feature |
Demonstration |
| Regular Dash channel passing |
Analogue 1 is evaluated by Dash and sent on Model IPC 0x321 every 10 ms; model results return on 0x322 every 10 steps. |
| Model step integration |
The runtime adapter calls the generated initialize/step functions serially, using MATLAB-staged timing metadata; it rejects periods other than 1000 us. |
| Nonvolatile memory |
Firmware declares an eight-byte calibration layout/defaults. CM7 restores compatible stored gain/offset before model initialization. An explicit XCP store saves them; initialization never overwrites them. |
| XCP |
Ginmake creates matching EPK/A2L descriptions for writable BenchGain and BenchOffset, plus read-only runtime identity. |
| Low-latency A2Ds |
Exactly one cached input refresh precedes each step; input 1 uses nominal 0.001421 V/count conversion and a 5000 us stale limit. |
| Urgent CAN Tx |
The adapter packs and enqueues physical CAN1 0x520 immediately after every step, with a 2000 us lifetime. Normal Dash Output transmission is not involved. |
The small fixed IPC layout is packed explicitly in main\main.c; Ginmake
imports the DBCs for their compatibility hash but generates only calibration/
identity descriptions, not unused CAN buffers or inaccessible XCP measurements.
The physical diagnostic frame is intentionally separate from the IPC DBC set.
Create And Build
Use a runtime release containing this example and compatible CD6 firmware.
Install the release’s Arm compiler, CMake/Ninja, licensed Ginmake (2.86 or newer),
and MATLAB with Simulink, Simulink Coder and Embedded Coder. No special Simulink
blocksets or customer files are needed. The model builder uses stock blocks
and is intended for R2023b or newer; MATLAB execution remains a verification
gate on a machine with those products.
-
Extract the runtime ZIP into a new project directory, creating
cdx-runtime. Copy the contents of cdx-runtime\examples\simulink-bench into
that project directory, including .gitignore. Do not work inside the runtime
dependency or overlay the handwritten project template.
-
In MATLAB, make the project root the current folder and run:
1addpath(fullfile(pwd, 'model'));
2run(fullfile('model', 'initialize.m'));
3create_model;
4test_model;
5cdx.workflow('full-build', 'cdx-project.json');
create_model produces and opens model\APP_bench.slx. It refuses to
overwrite a file or loaded model. It is a one-time bootstrap, deliberately
separate from the repeatable initialization script. Keep the generated model
when editing it and version-control the .slx as model source. Embedded
Coder output directories and simulation caches are ignored.
There is no hand-authored C substitute in the production build.
-
For later builds with MATLAB installed on the build PC:
1.\cdx-runtime\bin\cdx.exe build
2.\cdx-runtime\bin\cdx.exe verify-image --image build\cm4-release\MDL_FIRM.bin
Outputs include:
build\cm4-release\CDX-Simulink-Bench.cdxmodelbuild\cm4-release\MDL_FIRM.bin (finalized image)ginmake-generated\a2l\CDX-Simulink-Bench.a2l
Never deploy an intermediate raw binary. Debug uses --preset cm4-debug.
Changing the model base period also requires intentional adapter/rate/timeout
changes; do not replace the staged timing header with a hand-written constant.
Remote MATLAB / Local Compile
Keep the same complete project and runtime release on both PCs. On the MATLAB
PC, run create_model once, then test_model and:
1cdx.codegen('cdx-project.json');
2cdx.cli('stage', 'cdx-project.json');
This still requires Ginmake, CMake and the configured compiler on the MATLAB PC
for the IPC/configure stage. Copy the resulting entire model-generated
directory and the matching project sources/model back to the local project.
Do not copy CMake caches, build outputs or .cdx machine-local state.
On the local PC run cdx-runtime\bin\cdx.exe compile. It does not invoke MATLAB.
Regenerate/stage after any model or interface change; compilation alone cannot
prove that staged C is up to date.
Dash Setup
Open dash\bench.cd6.gdd in a compatible Dash Design release. It is a basic
editable setup, with no model firmware embedded initially. Load/import the
newly built .cdxmodel using Dash Design’s Load Model operation; retain the
matching packaged DBCs and existing channel mappings. Save a separate deployment
copy, for example dash\bench-model.cd6.gdd, before loading onto a CD6.
If an older copy reports that Bench_* receive channel names already exist,
replace the starter with this version of dash\bench.cd6.gdd, then close and
reopen it in Dash Design before embedding into the current setup. The corrected
native setup preserves identical receive source/output names; older XML imports
renamed the sources to Bench_*:Source, preventing model import from reusing them.
Copy the updated IPC DBCs too and recompile: their explicit 10 ms cycle time
keeps Dash-to-model transmission at 100 Hz after model import replaces the
starter transmitter. Missing DBC cycle times default to 2 Hz in Dash Design.
The source is dash\bench.xml. To recreate the editable setup using Dash
Design’s unattended CLI, choose a new output filename:
1$app = 'C:\Program Files\GEMS\Dash Design\DashDesign.exe' # Use your installed path.
2$p = Start-Process $app -ArgumentList '--convert-setup setup "dash\bench.xml" "dash\bench-new.cd6.gdd"' -Wait -PassThru
3if ($p.ExitCode -ne 0) { throw 'Dash setup conversion failed' }
Keep the supplied XML as the source of truth. The Dash Design build used for
regeneration must preserve CAN source names on XML import (without appending
:Source); use the supplied native setup with older builds. XML export omits
the transmit frame’s can_id when exporting a native
setup back to XML. Before reimporting such an exported XML file, restore
<can_id>#321</can_id> on the Model IPC transmit frame. The supplied XML and
native setup already contain the correct identifier; this is an exporter
round-trip limitation, not a change to the IPC interface.
| Link |
Identifier / settings |
| Model IPC, Dash to model |
Standard 0x321, two bytes: unsigned little-endian millivolts. |
| Model IPC, model to Dash |
Standard 0x322, eight bytes; see below. |
| Physical CAN1 urgent |
Standard 0x520, classic eight-byte frame, 500 kbit/s, every 1 ms. No Dash transmitter should duplicate it. |
| Physical CAN1 XCP |
Master to device 0x650, device to master 0x651, classic CAN, 500 kbit/s. |
The setup’s gauges show the ordinary input, both returned results, the wrapping
step counter, status and urgent rejection count. Nominal ADC scaling is not
an individually calibrated voltage measurement. Use the same input scaling
when comparing the two paths; their acquisition times are not synchronized.
Result Payloads And Failure Handling
Both result frames use bytes 0..1 for Dash-result millivolts, 2..3 for fast-result
millivolts, and 4..5 for the low 16 bits of the step count, all little-endian.
The step count wraps after 65.536 seconds; it is not elapsed wall time.
For IPC 0x322, byte 6 is a bit mask:
- Bit 0: ordinary input received within the last 100 ms.
- Bit 1: fast input is valid and fresh enough.
- Bit 2: urgent request rejected on this reporting step (queue full/offline).
- Bit 3: a previous normal IPC report was rejected because its queue was full.
This remains visible until a subsequent report is accepted.
Byte 7 counts urgent enqueue rejections, saturating at 255, and resets at model
initialization. Rejected requests are not retried. For urgent 0x520, byte 6
contains only the two input-valid bits and byte 7 is reserved/zero; the result of
that same enqueue cannot be reported in the frame being enqueued.
Invalid inputs produce zero transmitted results, even with a nonzero offset.
The model still steps with zero for the invalid input. Missing/offline/stale ADC
is deliberately a degraded condition, not a model fault. Repeated scans age out
through the runtime cache. Other unexpected API errors, invalid calibration
(including NaN), a wrong model period, or nonfinite/out-of-range generated
outputs return an error to the runtime and fault the model.
Acceptance into an urgent queue is not delivery. Expiry, arbitration, disabled
ports, bus errors and resets can discard a request without a completion callback.
At 500 kbit/s, budget roughly a quarter to a third of the bus for this traffic,
plus XCP and other frames. The native simulator does not emulate fast I/O and
therefore shows its invalid/offline diagnostics.
XCP And Nonvolatile Calibration
Load the matching generated A2L, connect using the above CAN1 settings and
check the EPK/station name (CDX Simulink Bench) before changing parameters.
The A2L describes addresses and types; generic clients may need manual CAN
transport configuration. DAQ, STIM, paging and programming are not supported.
| Parameter |
XCP address |
Type |
Default |
Accepted range |
BenchGain |
0xF000 |
little-endian IEEE single |
1 |
0..4 |
BenchOffset |
0xF004 |
little-endian IEEE single, V |
0 |
0..2 |
For a steady 2 V input, gain 2 and offset 0.5 should produce approximately
4.5 V on both paths. Results saturate at 10 V. Live multi-value updates are
not atomic: intermediate gain/offset combinations may be observed. This is
a bench demonstration, not a coherent calibration transaction.
An XCP DOWNLOAD changes RAM only. Use the client’s store calibration action
(SET_REQUEST(STORE_CAL_REQ)), then wait for EV_STORE_CAL, not just command
acceptance, before power cycling. CM7 owns the two-slot eMMC storage; the model
does not write files. Storage failure reports EV_USER/IO_ERROR rather than a
successful store. Firmware without storage cannot demonstrate persistence.
After a completed store and power cycle, the same layout restores gain/offset
before the first model initialization. Changing the representation requires a
new layout ID/version and matching defaults; rejected records use defaults.
Verification
Run the shipped adapter tests without MATLAB or hardware:
1cmake -S tests -B build\adapter-tests -G "Visual Studio 18 2026" -A x64
2cmake --build build\adapter-tests --config Debug
3ctest --test-dir build\adapter-tests -C Debug --output-on-failure
Select an installed Visual Studio generator (for example 17 2022) if different.
Tests compile the real adapter against public CDX headers, with explicit
runtime and model doubles confined to tests. They check exact payload bytes,
step/refresh/send rates, restored calibration preservation, absent/stale inputs,
clock wrap, queue pressure, saturating diagnostics and fatal errors. They do
not test Embedded Coder output, eMMC durability or physical CAN latency.
On the MATLAB PC, test_model simulates the actual block diagram using nominal,
calibrated, saturation and zero cases and checks the exact 1000 us period.
Then generate, stage and build the actual model before deployment.
On hardware:
- Verify firmware identity, READY/RUNNING state and matching IPC hash.
- Apply safe 0..5 V bench inputs and compare ordinary/fast returned values.
- Capture CAN1
0x520: check scaling, counter and input-valid bits. Measure
ADC-to-CAN latency and worst-case step execution under representative load.
- Check stale/offline/queue-pressure diagnostics without relying on a held
input value as a valid sample.
- Change gain/offset via XCP, store, wait for completion, power cycle, and verify
restored outputs. Separately exercise failed/interrupted stores.
MATLAB creation/simulation/code generation, full generated-model linking,
physical deployment, latency and power-cycle persistence require those external
tools/hardware and must not be inferred from native adapter test success.
Using the Model API
Typical Use
In a typical project, a Simulink model reads dash channels, computes outputs and
sends results back to the dash. You rarely call the CAN functions yourself:
Ginmake and the runtime’s CMake helpers generate that code.
Model IPC
The CD6 has two processor cores. The dash firmware runs on the CM7 core and owns
the display, inputs, logging and external CAN. Your model runs on the CM4 core.
Model IPC (inter-processor communication) is the virtual CAN connection
between them. It has no external connector. It is not really a CAN bus at all and operates via shared memory - but familiar CAN semantics are used for message framing and signal encoding.
- Two DBC files define the IPC messages. Write them yourself or export them
from Dash Design.
- The dash transmits selected channel values to the model and receives model
outputs as dash channels, which can then be displayed, logged or forwarded to
external CAN.
- Ginmake turns the DBCs into get/set functions and Simulink signals, so the
model works with named signals rather than frames.
See Model IPC Messages
for the DBC directions and the Dash Design and Ginmake steps.
Model Callbacks
The runtime runs your application through five callbacks declared in
cdx_app_functions.h:
flowchart LR
    subgraph Start["Start-up (once)"]
        A["system_init"] --> B["model_period_us_get"] --> C["model_init"]
    end
    subgraph Run["Running"]
        D["can_rx_handle<br/>each IPC frame"] --> E["model_step<br/>each period"]
        E --> D
    end
    C --> D
Each name above is shown without its CDX_app_ prefix.
| Callback |
When it runs |
Typical work |
CDX_app_system_init |
Once at CM4 start-up |
Initialise generated IPC code and other application resources |
CDX_app_model_period_us_get |
Once, after system initialisation |
Return the fixed step period in microseconds |
CDX_app_model_init |
Once, before the model starts running |
Call the model’s initialise function |
CDX_app_can_rx_handle |
For each received IPC frame, before the next step |
Pass the frame to the generated IPC decoder |
CDX_app_model_step |
Once per period |
Refresh inputs, call the model’s step function, send outputs |
Rules for every callback:
- Callbacks run one at a time in the foreground, never from an interrupt. Do not
call CDX functions from interrupts.
- Keep each callback short and bounded. A late step is not replayed: missed
periods are counted.
- The runtime supports a single base rate. Schedule any slower rates inside
the step.
- Returning a status other than
CDX_STATUS_OK faults the model. A receive
handler that does not use a frame should return CDX_STATUS_MESSAGE_IGNORED
(or CDX_STATUS_MULTIPLEX_IGNORED / CDX_STATUS_NO_DATA) instead.
- Sending is unavailable during the initialisation callbacks. Send from the step.
Implementing The Callbacks
Choose one of these approaches:
- Simulink model, no hand-written C (recommended). Call
CDX_RT_configure_simulink in CMakeLists.txt with your model’s header,
initialise and step functions. It generates all five callbacks. Each step
refreshes the fast-I/O inputs, runs the model, sends any urgent CAN frames and
then sends the IPC outputs. See Simulink Projects
and the template’s CMake adapter.
- Hand-written adapter. Implement the five callbacks yourself in
main\,
calling the model and the Ginmake-generated IPC functions. Use this when you
need extra C code, for example to build a custom external CAN message. The
project template
and echo example work
this way.
Most models also read the CD6 analogue inputs through the
fast-I/O signals
and use calibration through the generated A2L and XCP.
The advanced topics cover lower-latency physical CAN
transmission and direct use of the CAN, DBC, time and memory functions in
hand-written code.
API Map
Include the public headers from the template’s include directory. The
API reference contains the authoritative
signatures, parameters, constraints and per-function failure results.
Calibration
cdx_cal.h exposes Ginmake identity measurements and access to restored
model-owned calibration data. CM7 provides the XCP service on a configured
external CAN interface. The model does not implement a network XCP server or
gain direct hardware access through this header. Ginmake generates calibration
A2L from the configured model descriptions.
See Calibration And NVM
for the template’s gain/offset demo, parameter layout/defaults, A2L generation
and explicit XCP save/restore workflow.
The runtime registers the restored calibration data for XCP access when a session
starts. You do not need to call the memory functions for this.
Advanced Topics
The following sections are for users who need to optimise latency or write
their own CAN, timing or memory handling. Ginmake-generated code already uses
the CAN, DBC and time functions correctly, so most projects can skip them.
Urgent Physical CAN Transmit
Ordinary model outputs travel over Model IPC to the dash, which then forwards
them to external CAN through its output configuration. When that delay matters,
for example for a torque or shift request to another ECU, the model can send a
frame directly on physical CAN1 or CAN2 through CM7 with
CDX_can_tx_urgent_enqueue from cdx_fast_io.h. This bypasses the dash’s
output processing.
The simplest way to use it is Ginmake’s urgent_tx configuration, which
generates a sender with step, periodic or triggered policies. See
Urgent physical CAN transmit.
To call it from hand-written code:
| Argument |
Rule |
port |
Physical CAN port: 0 for CAN1, 1 for CAN2. Not the logical IPC bus. |
params |
deadline_ticks must be zero. Only the IDE, EDL and BRS flags are supported. FD lengths must match a CAN-FD DLC. |
data |
Aligned payload, copied during the call. NULL only for a zero-length frame. |
lifetime_us |
Maximum age, 1 to 1,000,000 microseconds, measured conservatively from the latest CM7 clock publication. Use this instead of a deadline. |
It returns CDX_STATUS_OK, CDX_STATUS_BAD_PARAM, CDX_STATUS_IPC_OFFLINE or
CDX_STATUS_QUEUE_FULL (the newest request is rejected).
- Call it from model callbacks only, never from interrupts or other threads.
- Each physical port queues up to four frames.
- Acceptance is not delivery. Unavailable ports, expiry, bus errors, stop/reset
and session changes can discard requests.
- There is no completion callback or cancellation, and a frame already being
transmitted cannot be pre-empted. The configured bus mode and CAN arbitration
still apply.
Direct Model IPC CAN Access
Ginmake-generated code normally calls these functions. Use them directly only
for hand-written CAN handling.
The Model IPC API provides one virtual CAN bus: CDX_CAN_BUS_ID_IPC. It
exchanges frames with CM7 over Model IPC, not an external CAN controller.
CDX_CAN_BUS_ID_CAN1 is a legacy alias for this same virtual bus. It does not
select external CAN1. CM7 owns the external CAN interfaces for the dash and XCP.
For physical CAN, see Urgent Physical CAN Transmit.
Signals can be forwarded between external CAN, dash channels and Model IPC
through the dash setup. See the
IPC message workflow
for Dash Design DBC export and Ginmake generation.
Model IPC frames follow these rules:
- Standard identifiers are 11 bits.
- Extended identifiers are 29 bits and require
CDX_CAN_FRAME_FLAG_IDE.
- Classic payloads are 0-8 bytes.
- FD payloads are 0-64 bytes and require
CDX_CAN_FRAME_FLAG_EDL.
- Bit-rate switching requires both
EDL and BRS.
- Remote-request and error frames are not supported.
The runtime rejects unsupported buses, flags, identifiers and lengths.
CDX_DATA_64 provides aligned eight-byte chunks. Its u8 view follows payload
byte order. Wider integer views use native-endian storage, not DBC conversions.
Received data_chunks is the ceiling of length_bytes / 8.
Receive Ownership
The received frame and its data are borrowed for the receive callback only.
Copy the bytes and metadata you need before returning. Do not retain the pointers.
timestamp_ticks is a receiver-local arrival timestamp. error_type and
hw_timestamp are zero: no physical error frame or hardware timestamp is provided.
Sending A Frame
Zero-initialize CDX_CAN_TX_PARAMS. Fill the identifier, flags and byte length,
then call CDX_can_tx_enqueue_copy. Use aligned chunks for payload storage.
You can reuse that storage immediately after the call. A null payload is allowed
only for a zero-length frame. The call is nonblocking and copies accepted data.
For example, from a model callback:
1#include "cdx_can.h"
2
3CDX_STATUS MDL_send_status(uint8_t value)
4{
5 CDX_CAN_TX_PARAMS params = {0};
6 CDX_DATA_64 payload = {0};
7
8 params.id = 0x100u;
9 params.length_bytes = 1u;
10 params.deadline_ticks = CDX_ticks_deadline_from_millisec(10u);
11 payload.u8[0] = value;
12
13 return CDX_can_tx_enqueue_copy(CDX_CAN_BUS_ID_IPC, ¶ms, &payload);
14}
Handle the status returned by CDX_can_tx_enqueue_copy:
| Status |
Meaning |
CDX_STATUS_OK |
The runtime copied and accepted the request. This does not mean delivery. |
CDX_STATUS_QUEUE_FULL |
The newest frame was rejected. Keep important work in bounded model-owned storage and retry on a later step. |
CDX_STATUS_TIMEOUT |
An enabled deadline has already expired. |
CDX_STATUS_IPC_OFFLINE |
There is no bound RUNNING session, or the session was lost. |
CDX_STATUS_BAD_PARAM |
The bus, pointer, flags, identifier or length is invalid. |
The runtime has 32-frame RX and TX queues and one in-flight TX batch. Enqueue
success does not guarantee later success. Do not spin inside a callback waiting
for queue space. Transport servicing also needs the foreground.
Completion And Deadlines
The API has no TX completion callbacks. Acceptance does not confirm that CM7
copied the frame, that physical CAN delivered it or that a model finished execution.
Queued frames can expire before publication to the peer. An IPC fault can discard
accepted queued or in-flight work.
deadline_ticks is an absolute local microsecond deadline:
- Zero disables expiry.
CDX_CAN_FRAME_FLAG_DISABLE_DEADLINE also disables expiry.- An enabled deadline must be within
CDX_MICROSEC_32_DEADLINE_MAX
(0x7fffffff) microseconds of the local clock.
Published batches remain peer-owned until acknowledgement. Expiry cannot cancel them.
Time And Wrap
The time API uses local elapsed time,
not synchronized CM4/CM7 clocks or calendar time. One tick is one microsecond.
The 32-bit microsecond counter wraps after about 71.6 minutes. Deadline
comparisons are limited to the half range, about 35.8 minutes. The foreground must
poll at least once per microsecond-counter wrap to keep the extended 64-bit counter valid.
Use CDX_ticks_deadline_from_millisec to form a nonzero CAN deadline. It clamps
the interval to the supported range and avoids zero because CAN treats zero as
disabled expiry. In contrast, CDX_microsec_deadline_remain does not treat zero
as disabled.
Convert received local timestamps with CDX_millisec_32_from_ticks only when
they are less than one microsecond-counter wrap old. CDX_can_is_timed_out_ms
uses wrapping millisecond subtraction. Its timestamp must be less than one
millisecond-counter wrap old. A zero timeout always times out.
Registered Model Memory
Use this only to expose additional model-owned storage through the bounded
memory functions.
During initialization, use CDX_memory_region_register to register model-owned
storage. You can register at most eight non-overlapping regions. Each region has:
- A logical 32-bit base address.
- Backing storage and a byte size.
- Write permission.
Keep the storage valid until runtime rebinding. Do not register peripherals or
shared IPC buffers. Rebinding clears registrations. Model stepping does not.
Reads and writes must fit entirely inside one registered region. Address
extension must be zero. Writes require a writable region.
Block operations return status and allow overlapping source/destination storage.
Scalar helpers use native-endian values and need no alignment. Scalar reads
return zero on failure. Use CDX_memory_read when you need to distinguish failure
from a valid zero value.
Registration can return CDX_STATUS_QUEUE_FULL when all eight slots are used.
Invalid storage, zero size, overlap or address overflow returns
CDX_STATUS_BAD_PARAM. Check registration results before exposing memory to
other model logic.
DBC Signals And Numeric Utilities
Ginmake-generated code also uses these helpers. Hand-written code can call them
to pack and unpack its own frames.
Pack, unpack and copy functions support little-endian and big-endian signals up
to 32 or 64 bits. Follow each function’s documented offset/bit numbering and
buffer-size constraints. Do not interchange Intel and Motorola start-bit rules.
Packing does not apply physical scaling or unit conversion.
Unpack functions and CDX_can_read_signal_* return raw unsigned bits, not a
signed or scaled physical value. Use the matching CDX_sign_extend_* helper for
a signed DBC signal, then apply the model’s scaling and offset separately. A
zero unpack result can also indicate an invalid request. Validate the definition
and payload size rather than treating zero as proof of a valid signal.
The numeric utilities also provide
byte swaps and IEEE-754 bit reinterpretation. Reinterpretation preserves a bit
pattern. It is not a numeric cast. Refer to the API’s width and floating-point
constraints rather than assuming unsupported formats.
Echo and Calibration Example
CD6 Echo
This handwritten application copies received Model IPC frames back to the dash
every 5 ms. It uses the public CDX callbacks and retains queued frames when the
runtime is busy. For a visible dash-channel example, start with project-template
instead.
Project Layout
1echo/
2  cdx-runtime/          Extract the runtime here; replace as a whole for updates
3  main/                Application, version and calibration headers
4  ginmake-generated/   Created automatically during the build
5  build/               Build output
6  CMakeLists.txt       Your application build and packaging commands
7  CMakePresets.json    Release and Debug presets
8  model-ipc.json5.in   Your Ginmake configuration
Copy this entire example outside cdx-runtime, then extract the runtime ZIP into
the copied project. Install the tools listed in
Installing Tools. From the copied project’s root:
1cmake --preset cm4-release -DCDX_RT_TOOLCHAIN_BIN="C:/sysgcc/arm-eabi/bin"
2cmake --build --preset cm4-release
The comments in CMakeLists.txt identify the application sources, optional
calibration and two runtime helpers. Common linking, generation bookkeeping and
the complete packaging command live in cdx-runtime, not in this project.
Import build/cm4-release/CD6-echo.cdxmodel into Dash Design and load the setup
onto a CD6 with model-runtime support. The finalized binary is
build/cm4-release/MDL_FIRM.bin. Do not deploy MDL_FIRM.raw.bin.
This example has no DBC interface. Do not add Model IPC DBC routes to its setup.
The resulting interface mismatch prevents startup. This is a callback/queue
example, not a ready-made dash display demonstration. Use the project-template
example for that.
Calibration
main/version.h defines this application’s REV_NAME and REV_VERSION directly.
The generated A2L uses these values for identification.
Enable the gain/offset tutorial in a fresh build directory:
1cmake --preset cm4-release -B build/calibration -DAPP_ECHO_CALIBRATION=ON -DCDX_RT_TOOLCHAIN_BIN="C:/sysgcc/arm-eabi/bin"
2cmake --build build/calibration
Keep ginmake-generated/a2l/CD6-Echo.a2l with the matching firmware.
The first payload byte becomes min(255, byte * gain + offset). The default gain
of 1 and offset of 0 leave it unchanged. Use a matching XCP connection on external
CAN1 or CAN2 to change parameters. To save changes, request STORE_CAL and wait
for completion. Persistence requires working dash storage.
Build configurations share ginmake-generated, so build them sequentially.
Use cm4-debug for Debug. To update, follow the runtime’s
verified upgrade and backup sequence.
Keep your edits outside the runtime folder and regenerate the deployment setup
before uploading the new build.
CDX CLI Guide
CDX command-line workflows
Use bin/cdx.exe to generate, build, package and deploy models. This bundled,
self-contained Windows x64 C#/.NET 10 executable needs no PowerShell, .NET SDK or
separately installed .NET runtime. Only maintainers need the SDK to build it.
Keep the executable, libraries, MATLAB helpers and release manifest together.
This guide is a reference. To build and run a first application, start with the
Quickstart.
Run as cdx
Add cdx-runtime\bin to PATH to run cdx without its directory or .exe.
Do not move cdx-runtime\bin\cdx.exe out of the runtime or add . to PATH.
These optional alternatives need no administrator rights. Explicit paths work
without setup.
Current terminal only (recommended)
Use a setup helper for the current terminal and its child programs only.
Other terminals, future sessions and your saved environment are unchanged.
From the application root in PowerShell:
1.\cdx-runtime\setup-cdx.ps1
2Get-Command cdx
3cdx --version
4cdx compile
Or Command Prompt (cmd.exe):
1cdx-runtime\setup-cdx.cmd
2where.exe cdx
3cdx --version
4cdx compile
Both helpers locate the runtime relative to themselves, check bin\cdx.exe and
prepend its absolute directory to PATH, supporting project paths with spaces.
Incomplete runtimes fail without changing PATH. The current directory stays
unchanged: run project commands from the application root or use --project.
Run the PowerShell helper directly in your cdx terminal. Dot-sourcing is not
required.
A separate powershell -File or pwsh -File process cannot change its parent.
From another batch file, use call cdx-runtime\setup-cdx.cmd to return after setup.
The PowerShell helper supports Windows PowerShell 5.1 and PowerShell 7+.
Approved releases carry a verified Authenticode signature. Your organisation’s
execution policy may require GEMS publisher approval. Neither helper changes
policy. If scripts are prohibited, use CMD or consult your administrator, not a
policy bypass.
Close the terminal to discard changes. Use separate terminals for projects with
different runtime versions.
Persistent user PATH
Add a runtime at a stable location to your user PATH for future sessions.
- Search Start for Edit environment variables for your account.
- Under User variables, edit Path (create it if absent).
- Add the absolute
bin directory, for example
C:\work\my-model\cdx-runtime\bin, without quotation marks or the executable name.
- Confirm the dialogs and open a new terminal. Restart VS Code for its integrated
terminal.
- Check
Get-Command cdx (PowerShell) or where.exe cdx (Command Prompt), then
cdx --version.
The system PATH is unchanged. Update/remove entries when runtimes move or are
deleted. Earlier entries can select the wrong version. For project-specific
runtimes, prefer the current-terminal helper or a shortcut.
Project-specific CDX terminal shortcuts
A desktop shortcut opens a shell in your project with its runtime on PATH,
without changing your saved environment.
-
Right-click the desktop and choose New > Shortcut.
-
Use this target, replacing C:\work\my-model with your application’s absolute
path and keeping the quotation marks:
1%SystemRoot%\System32\cmd.exe /d /s /k ""C:\work\my-model\cdx-runtime\setup-cdx.cmd""
-
Name it CDX terminal - my-model.
-
In Properties, set Start in to the application root, for example
C:\work\my-model.
-
Open it and run where.exe cdx, cdx --version and cdx compile.
For Windows PowerShell, use the same steps with:
1%SystemRoot%\System32\WindowsPowerShell\v1.0\powershell.exe -NoLogo -NoProfile -NoExit -File "C:\work\my-model\cdx-runtime\setup-cdx.ps1"
For PowerShell 7, substitute the quoted absolute path to pwsh.exe. -NoExit
keeps the prepared shell open. Do not add an execution-policy bypass.
Current-terminal scope and policy rules
also apply here. CMD needs no PowerShell. Update Target and Start in after
moving the project. Double-clicking a setup script alone does not keep its
terminal open.
No PATH setup
Run the executable by path instead. From the application root, either shell accepts:
1cdx-runtime\bin\cdx compile
Inside cdx-runtime\bin, Command Prompt accepts cdx. PowerShell requires .\cdx
because it does not search the current directory. Both shells allow omitting .exe.
For an unexpected runtime, check Get-Command cdx -All or where.exe cdx.
Use the project-local path or a fresh project-specific terminal. CLI/runtime
matching applies regardless of PATH setup.
Discover commands
Use help for commands/options and doctor for prerequisites. From your project:
1cdx-runtime\bin\cdx.exe --help
2cdx-runtime\bin\cdx.exe help build
3cdx-runtime\bin\cdx.exe --version
4cdx-runtime\bin\cdx.exe doctor --operation build
5cdx-runtime\bin\cdx.exe doctor --operation package --json
Help and version need neither a project nor build/deployment tools. doctor
checks executables and deployment capabilities,
including the unattended-upload member when selecting a device. It never installs
or repairs software. Licence usability, the specific package/setup and physical
upload remain unverified.
| Operation |
Required tools |
| Package finalized image |
None external. |
| Package ELF |
ARM objcopy. |
| Compile |
CMake, Ninja, ARM GNU compiler targeting the required CM4 ABI, licensed Ginmake. |
| Generate model |
Compilation tools plus MATLAB, Simulink Coder and Embedded Coder. |
Project configuration
Copy the example’s cdx-project.json into your application root to select runtime,
preset and paths. Paths are relative to that file, not the terminal.
The CLI searches the current directory and parents. --project selects a
configuration file or project directory.
 1{
 2  "format": 1,
 3  "runtime": "cdx-runtime",
 4  "preset": "cm4-release",
 5  "generated_sources": "model-generated",
 6  "model": "model/hello.slx",
 7  "initialization": "model/initialize.m",
 8  "setup": "templates/model.cd6.gdd",
 9  "deployment_setup": "output/model.cd6.gdd"
10}
Add model/initialization and setup/output paths only for operations you use.
Create the deployment output directory explicitly.
The project-owned initialization script runs in MATLAB’s base workspace before
loading the model. It must establish paths, custom signal classes, dictionaries
and workspace values without silently saving/discarding user changes. Generation
uses the project root as MATLAB’s current folder, so build paths from the script’s
location. Simulink Projects provides a complete
script, including cdx.inputs for CDX fast-I/O signals.
Shared tool paths go in the project file:
1{
2  "tools": {
3    "cmake": "%CDX_TOOLS%\\cmake\\bin\\cmake.exe",
4    "ginmake": "%CDX_TOOLS%\\ginmake\\ginmake.exe",
5    "matlab": "%MATLAB_ROOT%\\bin\\matlab.exe"
6  }
7}
All project paths accept Windows %VAR% references, expanded when used.
Undefined variables cause configuration errors. Define variables per machine
to share paths.
Machine-local executable paths belong in ignored cdx-project.local.json:
1{
2  "tools": {
3    "matlab": "C:/Program Files/MATLAB/R2023b/bin/matlab.exe",
4    "ginmake": "C:/Program Files/GEMS/Ginmake/ginmake.exe"
5  }
6}
CLI tool keys are cmake, ginmake, matlab and objcopy. Both files treat null,
empty and whitespace-only values as omitted, including Dash Design fields.
| Setting |
Behaviour |
| Omitted shared value |
CLI default. |
| Empty local value |
Shared setting unchanged. |
| Non-empty local value |
Override that shared tools key only. |
CMake controls compiler, target, DBCs, package metadata and outputs. Configure exports
.cdx/<preset>.json workflow metadata: do not edit it. The CLI accepts Dash Design’s
cli, compiler and ninja tool fields, but CMake presets/cache still select
compiler and Ninja.
Project operations require a CLI matching the selected runtime’s version and
bundled executable bytes. Another executable on PATH cannot bypass this check.
Individual and complete workflows
Run individual stages or join them with + in execution order. build combines
incremental MATLAB generation with compilation and packaging.
flowchart LR
    subgraph build["build = incremental matlab + compile"]
        direction LR
        matlab["matlab<br/>(build skips when up to date)"] -->|"staged C sources"| compile["compile"]
    end
    compile -->|".cdxmodel package + MDL_FIRM.bin"| embed["embed"]
    embed -->|"prepared deployment .cd6.gdd"| deploy["deploy"]
    deploy --> programmed["programmed CD6"]
    implicit["compile+deploy implicitly embeds"] -.-> embed
 1cdx-runtime\bin\cdx.exe configure
 2cdx-runtime\bin\cdx.exe ipc
 3cdx-runtime\bin\cdx.exe codegen
 4cdx-runtime\bin\cdx.exe stage
 5cdx-runtime\bin\cdx.exe matlab
 6cdx-runtime\bin\cdx.exe compile
 7cdx-runtime\bin\cdx.exe matlab+compile
 8cdx-runtime\bin\cdx.exe build
 9cdx-runtime\bin\cdx.exe embed
10cdx-runtime\bin\cdx.exe compile+embed
11cdx-runtime\bin\cdx.exe embed+deploy --serial 12345
12cdx-runtime\bin\cdx.exe compile+deploy --serial 12345
13cdx-runtime\bin\cdx.exe matlab+compile+deploy --serial 12345
14cdx-runtime\bin\cdx.exe build+deploy --serial 12345
15cdx-runtime\bin\cdx.exe devices --json
16cdx-runtime\bin\cdx.exe deploy
17cdx-runtime\bin\cdx.exe deploy --serial 12345
| Stage |
Work performed |
matlab |
Configure CMake, generate IPC and MATLAB/Simulink code, stage sources. No compilation or upload. |
build |
Refresh IPC/workspaces, generate/stage MATLAB code if stale, compile/package incrementally. |
compile |
CMake configure/build/package of staged sources, regenerating IPC as needed. No MATLAB or upload. |
embed |
Embed package in source setup, save separate deployment copy. No hardware access. |
deploy |
Upload prepared setup only. No generation, compilation or implicit embedding. |
The CLI validates the entire sequence and options before work, stops on first
failure and passes only successful outputs onward.
| Pipeline |
Behaviour |
compile+deploy |
Compile, implicitly embed, upload. |
matlab+compile+deploy, build+deploy |
Full generation-to-upload sequence. |
matlab+compile+embed+deploy |
Explicit full sequence. |
compile+embed |
Compile and prepare without uploading. |
embed+deploy |
Prepare with existing package, then upload. |
Migration and compatibility aliases
Breaking change: cdx build includes incremental MATLAB generation. Change
staged-C-only rebuild scripts to cdx compile. Explicit matlab always attempts
generation, unlike build, so matlab+compile is not an exact alias.
| Alias |
Equivalent pipeline |
full-build |
build |
full-build-embed |
build+embed |
full-build-deploy, build-deploy |
build+deploy |
embed-setup |
embed |
Prefer stage names/pipelines in new scripts. Hyphenated aliases still work but are
hidden from top-level help. Use cdx help <alias>.
Incremental MATLAB generation
build and aliases skip MATLAB and staging only when saved input/output content
hashes match, not timestamps. Compilation uses CMake/Ninja’s incremental build.
First, CMake configures and updates IPC/workspaces. CMake/Ginmake regenerates
missing/stale outputs from configuration, DBC and declared INPUTS dependencies.
The MATLAB check includes refreshed contents at default/custom workspace locations
exported by the CMake helper.
Successful CLI matlab or stale build generation/staging records hashes in
.cdx/matlab-build.json. The conservative check covers:
- Project files: model, initialization scripts, dictionaries, parameter data,
project/local configuration and generated workspaces.
- Runtime distribution, preset and all exported IPC outputs.
- MATLAB dependency-analysis results, active referenced models and open dictionaries
recorded before generation.
- Staging manifest, generated files and complete staged source tree.
The project scan excludes .git, .vs, .cdx, build, the selected CMake binary
directory, staged sources and configured deployment output (its directory for
filename templates). Runtime checks are separate. Unrelated project changes can
trigger generation: keep other build artifacts outside the source tree.
Declare external/dynamically loaded data, undiscoverable dependencies and inputs
under excluded paths with codegen_inputs:
1"codegen_inputs": ["../shared-models", "../calibration/parameters.mat"]
Paths can be absolute or project-configuration-relative. Directory scans are
recursive and detect additions/removals. Missing declared inputs fail. Do not
list generation outputs or changing build/log directories.
The first post-migration build regenerates: staged C alone cannot prove model
freshness. Missing/modified/extra staged files, changed presets or unavailable
dependency metadata also prevent skipping. Failed generation invalidates the old
fingerprint. Inputs changing during generation cause an error, not a fresh fingerprint.
Use cdx matlab or cdx matlab+compile after MATLAB/toolbox or non-file dependency
changes, such as environment variables, network data or callbacks. File checks
cannot reliably infer these. MATLAB’s slbuild may reuse its cache.
Current-session cdx.workflow requests generation without establishing a CLI
fingerprint.
--skip-matlab removes generation/staging only, leaving compilation and later
stages. It accepts build/full-build and combinations containing both matlab
and compile, including aliases, but not plain matlab, compile or deploy.
For example, build-deploy --skip-matlab equals compile+deploy. Reusing staged
sources does not verify model freshness.
codegen generates IPC before matlab -batch, without staging failed/partial
generation. stage replaces the complete owned source tree, removing obsolete
sources from compilation. Project operations take an exclusive project lock.
CMake’s Ginmake rule locks the generated directory exclusively.
Select presets with --preset. Direct CMake and VS Code builds remain supported.
Packaging is a tracked link byproduct, regenerated if missing. DBC, version,
configuration and tool changes invalidate corresponding outputs.
Deploying to a display
Use deploy or pipelines ending in it to upload to a selected display.
Deployment compatibility and safety rules
apply throughout.
| Selection |
Behaviour |
No --serial |
First USB display in Dash Design’s device-list order, even with several attached. Fail if none. No network fallback. |
Explicit --serial |
Must match exactly one device. Required for network displays. No USB fallback. |
Diagnostics and results report the selected serial. Automatic USB selection
requires IsUsbAt. devices --json reports is_usb as true/false when supported,
or null on older COM servers. VID/PID identifies the display model, not transport.
For unknown transport, update Dash Design or supply --serial, which older servers
still support. Immediately before upload, connection type is rechecked. Disappearing
or ambiguous devices fail rather than switch transport.
Negative native progress means preparation/waiting, not a negative percentage.
Stderr progress prints only when its displayed value changes.
Uploads default to a 300-second timeout. --timeout SECONDS accepts positive values up to
86400. Timeout/cancellation requests job cancellation and briefly waits for
confirmation. An unconfirmed stop reports unknown device state: stopping the client
may not stop programming. Synchronous COM calls are not forcibly interrupted.
Success does not verify compatibility or physical model startup/IPC. With the
mismatch override, results include display_mismatch_allowed and
model_startup_verified: false.
Dash Design deployment compatibility
Run cdx doctor --operation deploy before preparing or uploading setups.
The CLI also enforces preflight before embedding, uploading and starting builds
in combined build/embed/deploy workflows.
The registered server must expose the read-only
SupportsCdxModelImageDescriptor(version) query and support every image descriptor
listed by cdx --version. Servers lacking the query fail explicitly, without
guessing capabilities from application version strings. Device enumeration remains
available.
Preflight confirms server format support only, not package integrity, setup/device
compatibility, display firmware or upload success. The query neither opens/modifies
setups nor imports packages or enumerates hardware. embed validates the actual
package when preparing a separate deployment copy.
To embed into Dash Design’s open editable setup, use --current-setup instead of
--setup:
1cdx build+embed+deploy --current-setup --dash-process 9876 --serial 12345
This includes unsaved edits and writes a separate copy to deployment_setup.
The open setup remains modified, without saving or renaming. --dash-process
selects the running Dash Design instance with that PID through its
process-specific COM Running Object Table endpoint. CDX Project Tools supplies
its own PID automatically for embedding, deployment and device enumeration.
CDX reports the selected PID and executable on stderr and never falls back to
another instance if that endpoint is unavailable. Keep that instance open and
run both processes at the same elevation level.
Without --dash-process, standalone commands retain registered COM activation;
with multiple open instances this does not guarantee which setup is selected.
Registration alone does not select an instance. Project Tools neither activates
the registered executable nor changes registration to select its instance.
Both CDX and Dash Design must support process selection; older runtimes reject
the new option.
Deployment requires IDashDevice.UploadSetupUnattended. Servers lacking it fail
before upload, even with an explicit serial. There is no interactive fallback.
Interactive automation clients can still use UploadSetup, but cdx does not.
Unattended upload rejects display-type mismatches, nonempty logs and excessive
RAM requirements with job errors, without dialogs or programming. Preserve/download
logs and resolve compatibility issues in Dash Design before retrying. Firmware
updates, raw setups, log erasure and implicit setup downloads are disabled.
Unsaved interactive setup edits cause failure rather than discard.
For a deliberate bench transfer test:
1cdx deploy --serial 12345 --allow-display-mismatch
--allow-display-mismatch works on deploy and pipelines ending in deploy,
including aliases. It requires an explicit, unambiguous --serial and disables
automatic USB selection. The initial UploadSetupUnattended contract includes
allowDisplayMismatch, without a separate capability property.
The override accepts only mismatches the interactive uploader would let you
confirm. Hard device restrictions and log, RAM, firmware and cancellation rules
remain unchanged.
CLI diagnostics and the native job warn that the setup may not function. See
upload results and cancellation.
Automatic output filenames
All --output options and deployment_setup accept date/build-number filename
templates. Create the output directory before these examples:
1cdx matlab+compile+deploy --output "output\model-{utc:yyyy-MM-dd_HHmmss}-{build}.cd6.gdd"
2cdx matlab+compile+embed --output "output\model-{utc:yyyyMMdd}-{build}.gdd" --build-number 42
3cdx package --image firmware.bin --name "My model" --output "output\model-{y2k}.cdxmodel"
4cdx finalize-image --image raw.bin --output "output\firmware-{utc:yyyyMMdd_HHmmss}.bin"
For device selection, see Deploying to a display.
build+deploy and aliases full-build-deploy/build-deploy run the same sequence.
| Token |
Meaning |
{utc:yyyy-MM-dd} |
UTC date, for example 2026-03-15. |
{utc:yyyyMMdd_HHmmss} |
UTC date and 24-hour time without Windows-invalid separators. |
{utc:FORMAT} |
Filename-safe .NET date/time format, invariant culture. |
{y2k} |
Whole UTC seconds since 2000-01-01T00:00:00Z. |
{unix} |
Whole UTC seconds since 1970-01-01T00:00:00Z. |
{build} |
Explicit --build-number VALUE, otherwise next project counter value. |
{{ and }} |
Literal braces. |
- Tokens are case-sensitive and allowed only in filenames, not directories.
- Date formats cannot contain braces. Avoid
/, \, : and ordinary ISO times
with colons: these are unsuitable for Windows filenames.
- Quote templates in PowerShell or Command Prompt. Escape literal directory braces.
- Parent directories must exist.
Unknown tokens, unbalanced braces and invalid Windows filenames fail without
silent sanitization.
Each command captures UTC once for all tokens. This dates naming, not necessarily
an existing image/package’s compilation. Current-session MATLAB’s separate embed
command captures its own start time. Second-resolution timestamps are not guaranteed
unique.
Explicit and automatic build numbers
--build-number accepts filename-safe strings, including leading zeroes or CI
identifiers such as pipeline-0042, without a project or counter advancement.
Otherwise, the first {build} reserves a number from .cdx/naming/build-number.json,
starting at 1. Repeated tokens reuse it. All project presets/output commands share
the counter. Date-only/literal names consume none.
Leaf commands discover projects in the current directory/parents or use
--project FILE|DIR. Without a project, {build} requires --build-number.
Reservation needs no runtime/build tools, uses an exclusive lock and persists
atomically. Lock contention, invalid state and exhaustion fail without resetting
or reusing numbers.
Failed naming/build/preparation can leave gaps: this is not a successful-build
count. Deleting state resets it. Project copies do not share a global sequence.
For CI/cross-machine uniqueness, pass the build system ID with --build-number.
Collisions and later deployment
Expanded-token names refuse existing destinations unless the output-producing
command uses --overwrite. The final atomic write also protects against files
appearing after the initial check.
Literal filenames retain existing replacement behaviour. Escaped braces alone
do not make names automatic. --overwrite cannot replace protected inputs,
including setup templates and packages.
For generated deployment names by default, set:
1"deployment_setup": "output\\model-{utc:yyyy-MM-dd_HHmmss}-{build}.cd6.gdd"
Project embed and setup-preparing pipelines record successful paths per preset
under .cdx/naming. With templated or unset deployment_setup, later deploy
reuses that path, not a fresh timestamp:
1cdx matlab+compile+embed --preset cm4-release
2cdx deploy --preset cm4-release
No prior preparation, changed templates or missing prepared files cause errors.
Failed preparation retains the previous record. Literal deployment_setup selects
that file. deploy --setup ACTUAL_FILE explicitly selects another prepared file.
Input options such as --setup are not templates. Combined build/deploy passes
the newly prepared path directly.
Templates change names only, not package metadata, firmware identity or CMake
ELF/package basenames. package --elf retains its CMake/options-defined basename
and rejects --output.
Generate names upstream and pass filename-safe --build-number values to avoid
duplicate counters.
Azure Pipelines run numbers
combine dates and build IDs/revisions.
CMake timestamps
and MSBuild property functions
also generate names. CDX uses braces, not $()/%, to avoid Windows shell expansion.
Prefer CI’s existing build ID. A Git description
can trace sources better than timestamps alone.
MATLAB, without starting another MATLAB
Use cdx.workflow for current-session generation/builds or cdx.cli for CLI
commands/flags. Add the runtime’s matlab directory to MATLAB’s path:
 1addpath(fullfile(projectRoot, 'cdx-runtime', 'matlab'));
 2config = fullfile(projectRoot, 'cdx-project.json');
 3cdx.cli('help', config, 'build');
 4cdx.cli('doctor', config, '--operation', 'codegen');
 5cdx.codegen(config);
 6cdx.cli('stage', config);
 7cdx.cli('compile', config);
 8cdx.workflow('full-build', config);
 9cdx.workflow('full-build-embed', config);
10cdx.workflow('full-build-deploy', config); % First USB display.
11cdx.workflow('full-build-deploy', config, 'Serial', '12345');
12cdx.workflow('full-build-embed', config, ...
13    'Output', 'output\model-{utc:yyyyMMdd}-{build}.gdd', 'BuildNumber', '0042');
cdx.workflow accepts full-build, full-build-embed and full-build-deploy with
MATLAB name/value options. It compiles after current-session generation, without
recursive code generation, CLI pipeline parsing or --skip-matlab.
cdx.cli forwards command names and flags unchanged:
1cdx.cli('compile+embed', config);
2cdx.cli('build+deploy', config, '--skip-matlab', '--serial', '12345');
3cdx.cli('matlab+compile', config); % Launches a separate matlab -batch process.
Pipelines containing matlab launch batch MATLAB unless --skip-matlab removes
generation. See incremental generation.
Current-session generation uses the explicit model and active referenced-model
build information, including shared utilities, sources, headers and include layout.
It excludes ert_main.c: the runtime supplies the entry point.
Generation restores paths, directory and temporary code-generation settings.
It rejects unsaved models/dictionaries without saving/discarding them. Newly loaded
models stay open and workspace initialization remains. R2023b compatibility and
real generation require release validation in an installed licensed environment.
Setup-producing workflows pass these options only to embed and deploy its
returned path:
| Option |
Value |
Output |
Output path. |
BuildNumber |
String. |
Overwrite |
Logical, default false. |
full-build rejects these options, retaining CMake’s package naming.
For the bench-only mismatch override,
full-build-deploy accepts 'AllowDisplayMismatch', true with 'Serial', '12345'.
Other workflows reject it before building. Individual uploads can use
cdx.cli('deploy', config, '--serial', '12345', '--allow-display-mismatch').
Consume the staged inventory, not an assumed flat directory:
1include("${CMAKE_CURRENT_SOURCE_DIR}/model-generated/cdx-generated.cmake")
2target_sources(your_target PRIVATE ${CDX_MODEL_SOURCES})
3target_include_directories(your_target PRIVATE ${CDX_MODEL_INCLUDE_DIRS})
The project-template example handles this automatically, with legacy flat-source
fallback until its first staged build.
Clean build outputs or reset the CMake cache
Use clean for build outputs or configure --fresh for the selected preset’s
CMake cache. Neither replaces the runtime.
For replacement, follow the verified upgrade and backup sequence
using cdx-runtime-<version>.zip for the downloaded version. The installed manifest
and verify-release result identify the active runtime, not an old archive filename.
From the application root, with the runtime on PATH:
clean defaults to --category build, running the selected preset’s CMake clean
target. It removes tracked outputs but keeps CMakeCache.txt and the generated
build system, without MATLAB or hardware access. Select another preset with
--preset cm4-debug.
To discard cached compiler/toolchain settings:
1cdx configure --fresh
2cdx compile
configure --fresh requires CMake 3.24 or newer. CMake’s --fresh removes the
selected preset’s CMakeCache.txt and CMakeFiles, then reconfigures and regenerates
CDX metadata. It leaves other presets, staged sources and application/runtime files
untouched, without cleaning outputs or removing the whole build directory.
Cache-only settings are lost. Put compiler/toolchain settings in
CMakeUserPresets.json or project presets first. Normal configure retains cached
settings.
Reset only Debug’s cache:
1cdx configure --fresh --preset cm4-debug
Explicit categories need no terminal setup:
1cdx-runtime\bin\cdx.exe clean --category staged
2cdx-runtime\bin\cdx.exe clean --category matlab
3cdx-runtime\bin\cdx.exe clean --category build
Staged/MATLAB outputs require matching .cdx-owned.json markers. Unmarked
directories are never automatically adopted/deleted. Review and move legacy
outputs aside before first managed staging. No category recursively deletes the
project, runtime, model, dictionary or user data.
Leaf operations
Leaf operations need no project or enclosing CMake/MATLAB workflow. Explicit paths
are relative to the current working directory.
1cdx finalize-image --image raw.bin --build-hash MODEL_IPC_HASH.bin --output MDL_FIRM.bin
2cdx verify-image --image MDL_FIRM.bin
3cdx package --elf model.elf --objcopy arm-none-eabi-objcopy --options model-package.json
4cdx package --image MDL_FIRM.bin --output model.cdxmodel --name "My Model" --rx model-output.dbc --tx model-input.dbc
5cdx verify-release --runtime cdx-runtime
6cdx embed --setup source.cd6.gdd --package model.cdxmodel --output output.cd6.gdd
7cdx deploy --setup output.cd6.gdd --serial 12345
Repeat --rx/--tx to preserve DBC repeats/directions. --protected produces a
protected package. Producer validation preserves exact-byte hashes and binary
contracts. It does not replace Dash Design’s DBC parsing/channel-binding validation.
| Operation |
Write behaviour |
finalize-image |
Default: replace input after validation. |
verify-image |
Never writes. |
| ELF conversion |
Stages all outputs before publication. |
Failed validation never replaces a valid image/package.
CMake’s leaf generate-ipc arguments --ginmake, --config,
--generated-directory and --working-directory describe its existing rule,
not another project configuration.
For verify-release --skip-manifest-hashes and missing/malformed manifests, see
Modified runtime verification. Inventory hashes
detect modification, not publisher authenticity.
Results and exit codes
--json emits one JSON result on stdout. Progress, child-process output, warnings and
errors go to stderr. Failures return no success-shaped JSON.
Device results contain devices entries with serial, name, description,
usb_vid and usb_pid.
| Exit |
Meaning |
| 0 |
Completed. Inspect doctor/unverified validation fields where applicable. |
| 2 |
Invalid command, arguments or JSON configuration |
| 3 |
Validation, configuration, I/O, missing tool or COM failure |
| 4 |
Child process returned a nonzero exit code |
| 5 |
Upload timeout |
| 6 |
Cancellation |
Project and build reference
Use this reference for custom builds and optional features. The
quickstart covers example-to-hardware workflows.
Keep the runtime intact, including licence notices.
Release versions
CLI, runtime, public API and package/templates share one release version, identified
by the ZIP filename, cdx --version and release-manifest.json’s version.
| Component |
Meaning |
| Major |
Incompatible API changes. |
| Minor |
Backward-compatible functionality. |
| Patch |
Fixes. |
Manifest schema and IPC ABI numbers describe formats/compatibility, not releases.
The model’s application-owned REV_VERSION is independent.
cdx-runtime\install-tools.ps1 (or install-tools.cmd) checks tools and offers to
install the supported ARM compiler beside older versions. See
Install Tools Script.
Install CMake and Ninja with Windows Package Manager:
1winget install --id Kitware.CMake --exact
2winget install --id Ninja-build.Ninja --exact
If the ARM compiler is absent from PATH, configure its location per preset before
cdx compile:
1cmake --preset cm4-release -DCDX_RT_TOOLCHAIN_BIN="C:/Tools/arm-gcc-15.3.rel2/bin"
2cdx compile
Substitute your compiler’s bin directory. CMake caches it per preset: repeat for
cm4-debug or after deleting the build directory.
Check & "C:\Tools\arm-gcc-15.3.rel2\bin\arm-none-eabi-gcc.exe" --version.
doctor --operation build checks objcopy on PATH or in local tool overrides,
not this CMake setting.
In VS Code, install Microsoft’s C/C++ and CMake Tools extensions, open the application
folder, select cm4-release or cm4-debug and build. Set CDX_RT_TOOLCHAIN_BIN
locally if needed. Application developers need no documentation tools.
Application build helpers
add_subdirectory(cdx-runtime) supplies the prebuilt library and two build helpers.
Your application owns its executable/sources. CMAKE_BUILD_TYPE selects the
included Release or Debug archive.
After declaring the executable and include directories:
1CDX_RT_configure_model(${PROJECT_NAME}
2  PACKAGE_NAME my-model
3  RX_DBC ipc/dash-receives.dbc
4  TX_DBC ipc/dash-transmits.dbc)
This supplies image descriptor, linker script, libraries and packaging. DBC paths
are project-relative and use dash directions.
| Option |
Meaning |
RX_DBC |
Model outputs, multiple files allowed. |
TX_DBC |
Model inputs, multiple files allowed. |
PACKAGE_NAME |
Defaults to executable target name. |
NAME |
Optional displayed model name. |
EPK_HEADER |
Overrides default ipc_model_epk.h. |
Omit both DBC keywords for no-DBC models. For automatic model-ipc.json5.in
generation, also call:
1CDX_RT_generate_ipc(${PROJECT_NAME}
2  CAN PREFIX ipc_model_ INPUTS main/version.h)
Keep Ginmake configuration consistent with those DBCs. CONFIG accepts another
.in template or plain JSON5. Plain configurations run from the project root,
so relative paths also work in manual Ginmake calls. INPUTS adds dependencies.
Set REV_NAME and REV_VERSION in application-owned main/version.h, independent
of dash firmware. The echo demonstrates optional calibration/A2L generation.
If running Ginmake separately, omit the helper and add generated sources/include
directory to the executable yourself.
The packaging helper runs bin/cdx.exe package --elf: objcopy, image
validation/finalization and packaging, with ELF-derived output paths. CMake supplies
JSON options, so clients need not repeat three commands/intermediate filenames.
Manual calls require --elf, plus --objcopy if the tool is not on PATH, and
generated --options <target>-package.json for DBC-based models. No-DBC models with objcopy
on PATH need only --elf.
Optional <target>-ipc generates IPC/workspaces separately. For plain Ginmake
configurations, WORKSPACE_DIR declares a nondefault workspace directory. Keep it
consistent with out_dir_workspace.
Runtime I/O constraints
The runtime does not supply POSIX file/console I/O. Its image includes explicit
newlib hooks for file, console and process operations:
_close, _lseek, _read, _write, _fstat, _getpid and _kill return -1._isatty returns 0 (not a terminal).- All report
ENOSYS, even for zero-length I/O, without accessing caller buffers.
The linker script separates immutable image segments from writable data/shared
memory without moving firmware addresses. This avoids syscall/RWX linker warnings
without suppression flags or hardware MPU changes.
CDX_USER_HEADER injects your types into every public cdx_*.h, before normal
includes and outside extern "C". Disabled by default, it is unnecessary when
building the runtime archive.
Keep main/cdx_user.h outside the replaceable runtime and enable it for application
targets only:
1target_include_directories(${PROJECT_NAME} PRIVATE "${CMAKE_CURRENT_SOURCE_DIR}/main")
2target_compile_definitions(${PROJECT_NAME} PRIVATE CDX_USER_HEADER="cdx_user.h")
Use guard CDX_USER_H_INCLUDED, checked even through nested CDX headers:
 1#ifndef CDX_USER_H_INCLUDED
 2#define CDX_USER_H_INCLUDED
 3
 4#include <stdint.h>
 5
 6typedef struct APP_SAMPLE_STRUCT
 7{
 8  uint32_t value;
 9} APP_SAMPLE;
10
11#endif
- Include the header’s own dependencies, not CDX headers whose declarations are
unavailable at this point.
- Support every application language. Guard C++-only declarations with
#ifdef __cplusplus.
- Apply the setting to every target needing the types, never the runtime library.
- Do not redefine CDX typedefs, change packing or alter public declarations:
the prebuilt ABI is fixed.
An enabled but missing header fails compilation.
MSVC simulator DLL
Both examples build native Windows simulator DLLs from the same model sources and
Ginmake-generated identity. Use a separate project build directory without the
ARM toolchain:
1cmake -S . -B build\simulator -G "Visual Studio 17 2022" -A Win32 -DCDX_RT_BUILD_SIMULATOR=ON
2cmake --build build\simulator --config Debug
Use the installed Visual Studio generator matching simulator architecture (Win32
or x64). In custom CMake projects, use add_library(target SHARED
...) instead of add_executable when CDX_RT_BUILD_SIMULATOR is enabled. Retain
normal configure/generation helpers.
Delivered simulator/ runtime sources produce DLL/PDB, not firmware or .cdxmodel.
MSVC, Windows SDK and Ginmake are required, not an ARM compiler for the DLL.
Rebuild the CD6 simulator display plugin with simulator-model support. Before
launching it or Dash Design, set CDX_MODEL_DLL to the absolute DLL path.
Use the matching CM4 image embedded in the setup. Only if absent, set
CDX_MODEL_IMAGE to finalized matching MDL_FIRM.bin. Build the image separately
and sequentially with the native build, using identical sources, version/EPK header
and DBCs. DLL EPK and DBC hash must match. Embedded image errors never fall back
to a sidecar. Independent dash setup identity is validated as on hardware.
Attach a native debugger and load the model PDB. Close simulation before DLL rebuilds.
Production controller, CAN3 transport, runtime and shared-memory/MU ownership
protocol remain, servicing both endpoints on one foreground thread with the real
steady clock. ARM/cache/interrupt/parallel-core faults and physical CAN timing
cannot be reproduced. Calibration defaults/shared memory work, not durable
persistence. Use only trusted DLLs: they execute inside the simulator process.
Modified runtime verification
Use unmodified GEMS runtimes normally. For intentional local changes, disable
hash checks from the application root:
1cdx-runtime\bin\cdx.exe verify-release --runtime cdx-runtime --skip-manifest-hashes
2cmake --preset cm4-release -DCDX_RT_VERIFY_MANIFEST_HASHES=OFF
| Setting |
Hash checks controlled |
CMake cache option (default ON) |
Release/Debug archives for prebuilt CM4. Full inventory for native simulator and CM4 runtime source builds. |
| CLI switch |
Full inventory during manual verification. |
Both warn when disabled. Compatibility, inventory syntax, applicable manifest/ABI,
library profile/inventory consistency and file-presence checks remain. Packaging’s
firmware CRC, descriptor and firmware-versus-DBC IPC hash checks are unaffected.
Restore ON or omit the CLI switch to re-enable hashes.
Without release-manifest.json, direct CMake and verify-release warn and skip
manifest checks regardless of these settings. Release version/ABI metadata and
compiler provenance become unavailable. Manual verification checks only both
archive paths. CM4 still requires both archives, GNU C/C++, CM4 target flags and
Release/Debug builds. Native MSVC source builds need no ARM archives without a
manifest, leaving file integrity unverified.
Malformed/incompatible manifests fail. Project workflows such as cdx compile
still require the manifest and matching bundled CLI.
Maintainer validation and release gates
Build/test the CLI independently of the embedded toolchain, then validate the
signed release on real tools/hardware:
1dotnet build model-runtime\tools\cdx-cli\cdx.csproj -c Release
2dotnet test model-runtime\tools\cdx-cli\tests\cdx.tests.csproj -c Release --filter TestCategory!=Parity
3dotnet test model-runtime\tools\cdx-cli\tests\cdx.tests.csproj -c Release --filter TestCategory=Parity
4dotnet publish model-runtime\tools\cdx-cli\cdx.csproj -c Release -r win-x64 --self-contained true -o model-runtime\build\cdx-cli
Only parity tests need PowerShell, using signed legacy scripts as a temporary
oracle, never customer execution paths. Source-tree CMake sets CDX_RT_CLI to
the published executable. Tests compare managed binary constants with authoritative
C headers.
The exporter tests, publishes/signs the executable, verifies signed optional
PowerShell setup/tool-installer helpers, copies .NET licence notices/MATLAB helpers,
hashes signed bytes for inventory and verifies the staging tree and extracted ZIP. It requires
the approved signing client and pinned SDK/CMSIS inputs, with no unsigned-release
fallback. Development publishes are unsigned, not approved releases. Service bundled
.NET with runtime updates.
Before certification, verify:
- Signed artifacts on restricted endpoints without PowerShell/separate .NET.
- Real batch/current-session MATLAB generation.
- Compatible Dash Design embedding/save behaviour.
- Physical deployment/model startup.
Development consumer migrations may exercise native builds earlier, but must record
gates and keep unverified MATLAB/deployment operations gated. Replace the whole
runtime, never overlay older versions. Mock tests do not certify hardware.
Updating the Runtime
Updating the Runtime
Each CDX runtime release replaces the complete cdx-runtime folder in your
project. Your application, DBCs, presets and root build files stay in place.
Identify The Installed Runtime
The installed release-manifest.json, not an old ZIP or README example,
identifies your runtime. From the project root, use the project-local executable:
1.\cdx-runtime\bin\cdx.exe --version
2.\cdx-runtime\bin\cdx.exe verify-release --runtime cdx-runtime
--version identifies the executable and supported formats.verify-release reports the installed runtime version and checks its inventory.
Do not copy a new executable into an older runtime or disable verification to
hide a mismatch.
Replace The Runtime
- Close running builds and terminals that use the old runtime.
- Check the new release’s compiler and API requirements. The new release’s
revision history lists changes since your version,
including migration notes.
- Open a new PowerShell terminal at the application root.
- Replace the archive path below with your downloaded
cdx-runtime-<version>.zip.
Run each command separately and stop if it fails:
 1$ErrorActionPreference = 'Stop'
 2$archive = 'C:\Downloads\cdx-runtime-<version>.zip'
 3$backup = Join-Path '.cdx' ('runtime-upgrade-' + [Guid]::NewGuid().ToString('N'))
 4Expand-Archive -LiteralPath $archive -DestinationPath $backup
 5& "$backup\cdx-runtime\bin\cdx.exe" verify-release --runtime "$backup\cdx-runtime"
 6if ($LASTEXITCODE -ne 0) { throw 'New runtime verification failed; installed runtime unchanged.' }
 7
 8Move-Item 'cdx-runtime' "$backup\previous-runtime"
 9Move-Item "$backup\cdx-runtime" 'cdx-runtime'
10foreach ($directory in @('build', 'ginmake-generated')) {
11    if (Test-Path -LiteralPath $directory) {
12        Move-Item $directory (Join-Path $backup "previous-$directory")
13    }
14}
These commands replace the complete runtime without merging versions. They
preserve the old runtime and generated outputs, and move all old preset caches
out of their active paths.
- Keep the printed/assigned
$backup path until you have validated the upgrade.
If you use custom output locations, move those generated directories aside too.
Never move application sources or staged model sources.
- Select the compiler required by the new manifest. Repeat terminal setup and
build, adapting this compiler path to your installation:
1$env:PATH = "C:\Tools\arm-gcc-15.3.rel2\bin;$env:PATH"
2.\cdx-runtime\setup-cdx.ps1
3cdx verify-release --runtime cdx-runtime
4cdx doctor --operation build
5cdx compile
6cdx verify-image --image build\cm4-release\MDL_FIRM.bin
7cdx doctor --operation deploy
compile regenerates IPC from the project’s configuration and DBCs. It builds
already staged model C sources. MATLAB regeneration and device programming are
separate operations.
- Before uploading, run
cdx embed, or reload the model in Dash Design, to
replace the deployment copy with the newly built package.
Do not upload an old prepared setup after upgrading.
Keep application files outside cdx-runtime. Do not copy the starter over an
existing application. If you only need to reset the compiler/cache, see
cache reset for
cdx configure --fresh.
Script Migration
cdx build includes incremental MATLAB generation. Scripts that only rebuild
staged C sources without MATLAB must use cdx compile. See
Migration and compatibility aliases.
Rebuilding the Runtime
Build the CDX runtime library from source
Application builds default to prebuilt CM4 libraries: lib\Release\libcdx_runtime.a
or lib\Debug\libcdx_runtime.a. Sources are included for optional rebuilds of
libcdx_runtime.a.
Included sources and prerequisites
source\model-runtime\src_lib: CM4 startup integration, runtime and CDX API.source\model-runtime\include: public headers for the standalone source build.source\src\model_ipc: shared IPC and calibration implementation.source\src\cd\outputs: DBC packing implementation.source\model-runtime\release: CMake library build definition used for the
prebuilt libraries.licenses\nxp and licenses\cmsis: required SDK sources, startup assembly,
device/CMSIS headers and original third-party notices.
Install Arm GNU GCC 10.3 or newer, CMake 3.21 or newer and Ninja per the
Installing Tools.
The compiler version in release-manifest.json identifies the bundled-library
compiler, not an exact-match application requirement. Use the supplied ARM
toolchain file for matching Cortex-M4, Thumb, FPv4-SP-D16 and hard-float ABI settings.
No separate SDK download, firmware repository, VisualGDB, MATLAB, .NET SDK,
documentation tools or signing client is needed. Ginmake is required for example
applications, not this library. This workflow rebuilds neither bundled cdx.exe
nor CM7 display firmware.
Including GEMS sources grants no open-source licence. The applicable GEMS agreement
still governs them. Retain all third-party notices.
Run commands from the application root containing cdx-runtime, in PowerShell
or Command Prompt. Keep outputs outside the downloaded runtime to preserve its
release inventory and prebuilt libraries.
Build and use the sources in an application
With supplied presets:
1cdx-runtime\bin\cdx.exe verify-release --runtime cdx-runtime
2cmake --preset cm4-release -DCDX_RT_BUILD_FROM_SOURCE=ON
3cmake --build --preset cm4-release
For Debug, configure and build separately:
1cmake --preset cm4-debug -DCDX_RT_BUILD_FROM_SOURCE=ON
2cmake --build --preset cm4-debug
CMake builds bundled GEMS and SDK/CMSIS sources and links the resulting library
instead of the prebuilt one. With the supplied layout, the archive is
build\cm4-release\cdx-runtime\runtime-source\lib\libcdx_runtime.a
(or the corresponding cm4-debug path).
Firmware finalization and .cdxmodel packaging are unchanged.
- Release uses
-O3 -DNDEBUG.
- Debug uses
-Og -g3.
CDX_RT_BUILD_FROM_SOURCE is for CM4 only, not CDX_RT_BUILD_SIMULATOR.
Each build directory caches this choice. cdx compile and
cdx compile --preset cm4-debug reuse it without MATLAB. cdx build also
regenerates/stages the model when recorded inputs or outputs are stale.
matlab+compile always requests generation. Migrate old no-MATLAB scripts to compile.
No compiler on PATH? Add "-DCDX_RT_TOOLCHAIN_BIN=C:\Tools\arm-eabi\bin"
(with your path) to each configure command.
Return to prebuilt libraries:
1cmake --preset cm4-release -DCDX_RT_BUILD_FROM_SOURCE=OFF
2cmake --build --preset cm4-release
3cmake --preset cm4-debug -DCDX_RT_BUILD_FROM_SOURCE=OFF
4cmake --build --preset cm4-debug
Build only the library
No application or Ginmake is needed. Verify the distribution before configuring:
this CMake project performs no inventory checks.
Use absolute toolchain and SDK/CMSIS paths. Replace C:\work\my-project with
your application root:
1cmake -S cdx-runtime\source\model-runtime\release -B build\runtime-release -G Ninja -DCMAKE_BUILD_TYPE=Release "-DCMAKE_TOOLCHAIN_FILE=C:\work\my-project\cdx-runtime\cmake\arm-gcc.cmake" "-DCDX_RT_SDK_ROOT=C:\work\my-project\cdx-runtime\licenses\nxp" "-DCDX_RT_CMSIS_ROOT=C:\work\my-project\cdx-runtime\licenses\cmsis"
2cmake --build build\runtime-release --target cdx_runtime
Output: build\runtime-release\lib\libcdx_runtime.a.
For Debug, configure with -B build\runtime-debug and -DCMAKE_BUILD_TYPE=Debug,
then build build\runtime-debug.
The standalone project enforces GCC 10.3 minimum but not the manifest’s exact
compiler version. Application builds still require GNU C/C++ and Cortex-M4
hard-float flags.
Do not overwrite cdx-runtime\lib or alter the manifest to disguise rebuilt
archives as supplied binaries. Prefer the application source-build option
to leave release files intact.
Local changes and source-level debugging
Unmodified distributions, including bundled sources, pass verify-release.
For intentional source changes, review and retain them, then explicitly disable
content-hash checks:
1cdx-runtime\bin\cdx.exe verify-release --runtime cdx-runtime --skip-manifest-hashes
2cmake --preset cm4-release -DCDX_RT_BUILD_FROM_SOURCE=ON -DCDX_RT_VERIFY_MANIFEST_HASHES=OFF
3cmake --build --preset cm4-release
These commands warn that file integrity is unverified. Required files,
compiler/ABI compatibility and manifest structure remain checked.
The CLI integrity policy lists operations
allowing local changes.
Restore original release files and set CDX_RT_VERIFY_MANIFEST_HASHES=ON
to re-enable content-hash validation. Do not disable it for normal builds.
Keep changed public API headers consistent between include and
source\model-runtime\include. Application and standalone builds use their
respective copies.
Debug libraries, including supplied prebuilts, contain relative paths:
- Resolve
./model-runtime/src_lib and ./src/model_ipc against cdx-runtime\source.
- Resolve SDK/CMSIS paths against
cdx-runtime, under licenses\nxp and licenses\cmsis.
Sources do not replace target/debugger setup or physical-hardware validation.
Revision History
CDX Runtime Revision History
This file lists the changes in each CDX Runtime release, newest first.
One release version covers the runtime library, public API, cdx command-line
tool, MATLAB helpers, CMake helpers and example projects. The ZIP filename,
cdx --version and version in release-manifest.json show the installed
release. Version numbers not listed here were not released.
- Major relates to the core dash generation (e.g. CD5x / CD6x).
- Minor More general changes that may cause incompatibilities.
- Revision General fixes and small improvements.
- Patch Minor fixes and improvements. Omitted if zero.
To upgrade, replace the complete cdx-runtime folder as described in
Updating the Runtime.
6.3.0 - 2026-11-12
Compatibility
- Dash Design version 2.4.15+ required for –dash-process fix.
New
- Added the Simulink Bench example. It shows
Model IPC, a 1 ms model step, persistent XCP calibration, fast ADC inputs and
urgent physical CAN transmit. It includes a model creation script, a basic
Dash Design setup and adapter tests.
- Added the Simulink Projects guide. It covers the
initialization script, CDX signals and building from Dash Design CDX Project
Tools.
- Added
install-tools.cmd and install-tools.ps1 to install the required
build tools, including Arm GNU Toolchain 15.3.rel2.
- CDX CLI: Added
--dash-process <PID> to select a specific running Dash Design
instance for embedding, deployment and device listing. CDX Project Tools
supplies its own process automatically.
Changed
- Application builds no longer need the exact compiler version recorded in
release-manifest.json. That version now only records which compiler built
the bundled libraries. Applications still need an arm-none-eabi GNU
compiler (GCC 10.3 or newer) with the Cortex-M4 hard-float settings.
cdx.generate now reads the model’s configured FixedStep, including
model-workspace expressions, to find the model period. It no longer inspects
individual block sample times; Simulink checks them during code generation.
auto is still rejected.- Empty,
null or whitespace-only tool paths in cdx-project.json and
cdx-project.local.json are now treated as not set, including fields written
by Dash Design.
- Documentation readability improvements.
6.2.4 - 2026-11-10
New
- Project paths, including tool paths in
cdx-project.json, can use Windows
%VAR% environment variable references. An undefined variable is reported as
a configuration error.
Fixed
- The error for an empty tool path now names the tool concerned.
6.2.3 - 2026-11-06
New
- Added per-channel ADC getter signals for Simulink:
CDX_adc_1_raw to
CDX_adc_8_raw, CDX_adc_1_voltage to CDX_adc_8_voltage and
CDX_adc_1_valid to CDX_adc_8_valid. Call cdx.inputs in your
initialization script to define them. Matching CDX_get_adc_* functions are
available in cdx_fast_io.h.
- Added the XCP station name (
GET_ID ASCII). It defaults to the model target
name and can be set with STATION_NAME in CDX_RT_configure_model. Named
images need display firmware and packaging tools that support image
descriptor versions 3 and 4. Older model images still load and report CD6.
- Added
cdx pipelines that combine stages, for example compile+embed,
build+deploy and matlab+compile+deploy. Pipelines validate every stage
before starting and stop on the first failure.
- Added incremental MATLAB generation:
cdx build skips Simulink generation
and staging when the recorded inputs and outputs are unchanged. Declare extra
dependencies with codegen_inputs.
- Added
cdx compile to build and package already staged sources without
starting MATLAB. cdx embed replaces cdx embed-setup to prepare a setup
without uploading.
- Added
--current-setup to embed into the setup currently open in Dash
Design, including unsaved edits. A separate deployment copy is written; the
open setup is not saved or renamed.
cdx doctor --operation deploy now checks that Dash Design supports the
model image formats used by this release.cdx.cli in MATLAB can run any cdx pipeline and option.
Changed
- Migration:
cdx build now decides whether Simulink generation is needed
before compiling. Scripts that build without MATLAB must use cdx compile.
Older command names remain available as aliases.
- Updated the offline manual and API reference.
6.2.0 - 2026-10-29
New
- Added low-latency fast I/O for Simulink models (
cdx_fast_io.h):
- ADC snapshots refreshed once before each model step, with raw values,
validity, sequence and timestamp data stores.
- Urgent physical CAN transmit on CAN1 or CAN2, configured with
urgent_tx
in Ginmake. Messages can send every step, periodically or when triggered,
with per-message status and counters.
CDX_RT_configure_simulink CMake helper to connect a generated model’s
initialize and step functions.cdx.adcSample to supply ADC test data in a Simulink harness.
- Fast I/O needs CD6 firmware with CDX fast I/O support and a Ginmake release
that supports
urgent_tx.
6.1.5 - 2026-10-27
New
- Added
cdx configure --fresh to reset the CMake cache, for example after
changing compiler. Requires CMake 3.24 or newer.
Changed
cdx clean with no options now removes the selected preset’s build outputs
while keeping its CMake cache.
6.1.4 - 2026-10-23
Changed
--allow-display-mismatch now uses the standard Dash Design unattended
upload interface. A Dash Design without unattended upload is rejected before
uploading.
6.1.3 - 2026-10-23
New
- Added
--allow-display-mismatch to deploy and full-build-deploy for
bench transfer tests on a display that differs from the setup’s display type.
It requires an explicit --serial. The setup may not function on that
hardware; do not use it for normal deployment.
6.1.2 - 2026-10-23
New
- New quickstart guide covering project creation, tool installation, building,
programming a CD6 and updating the runtime.
- Added
setup-cdx.cmd and setup-cdx.ps1 to put cdx on the terminal’s
PATH.
- Added
cdx embed-setup to prepare a separate deployment copy of a setup,
and cdx full-build-embed and cdx full-build-deploy to generate, build,
embed and optionally upload in one command.
- Without
--serial, deployment now selects the first USB display.
- Added automatic output filenames using date, time and build number tokens,
such as
{utc:yyyy-MM-dd} and {build}.
- The runtime image now provides newlib file, console and process hooks.
These operations report “not supported” (
ENOSYS) instead of causing linker
warnings.
Fixed
- Uploading with the 6.1.0 CLI could fail with
Cannot implicitly convert type 'int' to 'bool'.
6.1.0 - 2026-10-23
New
- Added the
cdx command-line tool (bin\cdx.exe) to verify the release,
check tools, generate, build, package, list devices and deploy models. It is
self-contained and needs no separate .NET or PowerShell installation.
- Added MATLAB helpers (
cdx.workflow, cdx.generate, cdx.cli) to generate
Simulink code, build and run cdx commands from MATLAB.
- Added a Windows simulator DLL build (
CDX_RT_BUILD_SIMULATOR) so models can
run and be debugged in the CD6 display simulator.
- Added the optional
CDX_USER_HEADER client header, included by every public
cdx_*.h header to share your own type definitions.
6.0.2 - 2026-10-16
New
- Added the
bool8_t type to cdx_utils.h.
6.0.1 - 2026-10-15
New
- Added options to skip release manifest file hash checks when intentionally
using modified runtime files:
-SkipManifestHashes for verify-release.ps1
and CDX_RT_VERIFY_MANIFEST_HASHES=OFF for CMake. A missing
release-manifest.json also skips manifest checks, with a warning.
Changed
- Minimum Ginmake version is now 2.83. Generated code checks the version
directly, so PowerShell is no longer needed for this check.
- Bundled PowerShell scripts are now digitally signed.
6.0.0 - 2026-10-15
First CDX Runtime release.
- Prebuilt Cortex-M4 runtime libraries (Release and Debug) and public
cdx_*.h
API headers for CAN, DBC packing/unpacking, calibration, memory, time and
status reporting.
- Model IPC between the CD6 display and the model using DBC files and Ginmake.
- Persistent XCP calibration.
- CMake helpers to build the model and package it as a
.cdxmodel for import
into Dash Design.
project-template and echo example projects.- Release manifest and verification of the runtime files.
- Offline manual and API reference.